
.JPG)
_vials.jpg)
.jpg)
Copyright Notice
Licensed under a Creative Commons Attribution 4.0 International License. To view a copy of this license, visit https://creativecommons.org/licenses/by/4.0/.
Bookshelf ID: NBK593214

An official website of the United States government

NCBI Bookshelf. A service of the National Library of Medicine, National Institutes of Health.
Open Resources for Nursing (Open RN); Ernstmeyer K, Christman E, editors. Nursing Skills [Internet]. Eau Claire (WI): Chippewa Valley Technical College; 2021.
Administering medication by the parenteral route is defined as medications placed into the tissues and the circulatory system by injection. There are several reasons why medications may be prescribed via the parenteral route. Medications administered parenterally are absorbed more quickly compared to oral ingestion, meaning they have a faster onset of action. Because they do not undergo digestive processes in the gastrointestinal tract, they are metabolized differently, resulting in a stronger effect than oral medications. The parenteral route may also be prescribed when patients are nauseated or unable to swallow.
Although an injectable medication has many benefits, there are additional safety precautions the nurse must take during administration because an injection is considered an invasive procedure. Injections cause a break in the protective barrier of the skin, and some are administered directly into the bloodstream so there is increased risk of infection and rapid development of life-threatening adverse reactions.
There are four potential routes of parenteral injections, including intradermal (IM), subcutaneous (SQ), intramuscular (IM), and intravenous (IV). An intradermal injection is administered in the dermis just below the epidermis. A subcutaneous injection is administered into adipose tissue under the dermis. An intramuscular injection is administered into a muscle. Intravenous medications are injected directly into the bloodstream. Administering medication via the intravenous (IV) route is discussed in the “IV Therapy Management” chapter. This chapter will describe several evidence-based guidelines for safe administration of parenteral medications.
Syringes are used to administer parenteral medications. A disposable syringe is a sterile device that is available in various sizes ranging from 0.5 mL to 60 mL. A syringe consists of a plunger, a barrel, and a needle hub. Syringes may be supplied individually or with a needle and protective cover attached. See Figure 18.1[1] for an illustration of the parts of a syringe.
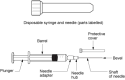
Parts of a Syringe
Luer lock syringes have threads in the needle hub that provide a secure connection of needles, tubing, or other devices. See Figure 18.2[2] for an image of a Luer lock syringe with a barrel and a readable scale. This image shows a syringe that holds 12 cc, also referred to as 12 mL. When withdrawing medication, match up the top of the plunger and the line on the barrel scale with the amount of medication you need to administer. In this image, 3 mL of medication is contained in the syringe.
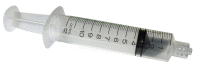
Luer Lock Syringe

Insulin is administered using a specific insulin syringe. Insulin syringes are marked in units, not milliliters (mL), because insulin is prescribed by providers in units, not mLs. A regular syringe marked in milliliters should never be used to administer insulin. All insulin syringes have orange caps for quick identification, but verify the markings are in units to prevent a medication error. See Figure 18.3[4] for an image of a 50-unit insulin syringe with a white safety shield attached.
Insulin Syringe
Needles are made out of stainless steel. They are sterile and disposable and are available in various lengths and sizes. A needle is made up of the hub, shaft, and bevel. The hub fits onto the tip of the syringe. All three parts must remain sterile at all times. The bevel is the tip of the needle that is slanted to create a slit into the skin. See Figure 18.4[5] for an image of a bevel.
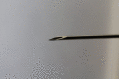
Bevel of a Needle
The gauge of a needle refers to its diameter. Needles range in various sized gauges from small diameter (25 to 29 gauge) to large diameter (18 to 22 gauge). Note that the larger the diameter of a needle, the smaller the gauge number. Larger diameter needles (18-22 gauge) are typically used to administer thicker medications or blood products. See Figure 18.5[6] for an image comparing various needle lengths and gauges. Read more about needle gauges according to type of injection in Table 18.2 in the “Anatomic Location” subsection.
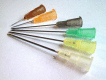
Needle Lengths and Gauges
Gauge and length are marked on the outer packaging of needles. Needle length varies from 1/8 inches to 3 inches and is selected based on the type of injection. Nurses select the appropriate gauge and length according to the medication ordered, the anatomical location selected, and the patient’s body mass and age. For example, an intramuscular injection requires a longer needle to reach muscle tissue than an intradermal injection that is inserted just under the epidermis. Read more about needle length according to type of injection in Table 18.2 in the “Anatomic Location” section.
Many needles have safety shields attached to prevent needlestick injuries. See Figure 18.6[7] for an image of a syringe inserted into a vial of medication with a needle and a type of safety shield attached.
Safety Shield on Needle
When administering an injection, the syringe should be held like a dart to prevent inadvertent release of medication as the needle is inserted. The needle should be inserted at the proper angle depending on the type of injection. See Table 18.2 for additional details regarding angles of insertion for each type of injection. The needle should be inserted all the way to the hub smoothly and quickly to reduce discomfort of the injection. See Figure 18.7[8] for an illustration of angles of insertion for each type of injection. After the needle is inserted, it is important to hold the syringe steady to prevent tissue damage. The needle should be removed at the same angle used for insertion.[9]
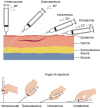
Angles of Insertion
It is important for the nurse to select the correct anatomical location for parenteral medication administration according to the type of injection prescribed and for optimal absorption of the medications. Injection of medication into the correct location also prevents injury to the tissues, nerves, blood vessels, and bones. Table 18.2 summarizes anatomical locations, needle sizes, amount of fluid, and the degree of angle of the needle insertion for each type of parenteral injection with life span and other considerations provided. Additional details regarding each type of injection are discussed later in this chapter.
Summarized Injection Information
| Injection Types | Locations | Needle Gauge and Length | Total Amount of Injectable Fluid | Degree of Angle When Injecting | Considerations |
|---|---|---|---|---|---|
| Intradermal |
| ●25-27G ●3/8” to 5/8” | 0.1 mL | 5-15 degree | The forearm is the recommended site for tuberculosis (TB) testing for all ages. Allergy testing may be performed between the scapulae. Older adults have decreased skin elasticity, so the skin should be held taut to ensure the medication is administered properly. |
| Subcutaneous | ●Outer upper arms ●Anterior thighs ●Upper Outer Gluteal Area ●Upper Back ●Abdomen | ●25-31G ●1/2” to 5/8” | Up to 1 mL Up to 0.5 mL in infants and small children | 45-90 degree | The older patient’s skin is less elastic, and subcutaneous tissue may be reduced in the skinfolds. The upper abdomen should be used for patients with less subcutaneous tissue. |
| Intramuscular | ●Ventrogluteal ●Vastus lateralis ●Deltoid | ●18 to 25G ●1/2” to 1 1/2” (based on age/size of patient and site used) | 0.5-1 mL (infants and children) 2-5 mL (adults) | 90 degree | The vastus lateralis site is preferred for infants because that muscle is most developed. The ventrogluteal site is recommended in adults. The deltoid site is recommended for vaccinations in adults. |
Parenteral medications are supplied in sterile vials, ampules, and prefilled syringes. Ampules are small glass containers containing liquid medication ranging from 1 mL to 10 mL sizes. They have a scored neck to indicate where to break the ampule. See Figure 18.8[10] for an image of an ampule of epinephrine.
Ampule of Epinephrine
Medication is withdrawn from an ampule using a syringe with a special needle called a blunt fill filter needle. These needles have a blunt end to prevent needlestick injuries and a filter to prevent glass particles from being drawn up into the syringe. See Figure 18.9[11] for an image of a blunt fill filter needle. Filter needles should never be used to inject medication into a patient. The filter needle should be removed and replaced with a needle appropriate in size and gauge for the type of injection and the anatomical location of the patient.
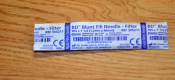
Blunt Fill Filter Needle
When breaking open an ampule, it is important to use appropriate steps to avoid injury. First, tap the ampule while holding it upright to move fluid down out of the neck. Place a piece of gauze around the neck, and then snap the neck away from your hands. See Figure 18.10[12] for an illustration of how to safely open an ampule.
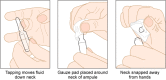
Opening an Ampule
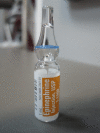
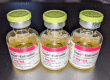
A vial is a single- or multi-dose plastic container with a rubber seal top. Most rubber seals are covered by a plastic cap. See Figure 18.11[14] for an image of a medication dispensed in a vial. A single-use vial must be discarded after one use. Multi-dose vials are used for medications like insulin and must be labelled with the date it was opened. Refer to agency policy regarding how long an open vial may be used and how it should be stored. For example, insulin is typically refrigerated until the vial is opened, and then it can be stored at room temperature for 28 days.
Vial
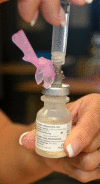
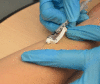
A vial is a closed system. Air must be injected prior to medication withdrawal to maintain a pressure gradient so that solution can be removed from the vial. It is also important to closely observe and maintain the tip of the needle within the level of medication inside the vial as it is removed. See Figure 18.12[15] for an image of removing medication from a vial.

Removing Medication From a Vial
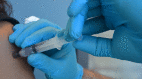
To remove medication from a vial, pull air into the syringe to match the amount of medication you plan to remove. Hold the syringe like a pencil and insert the needle into the rubber stopper on the top of the vial. Push the plunger down until all of the air is in the bottle. This helps to keep the right amount of pressure in the bottle and makes it easier to draw up the medication. With the needle still in the vial, turn the bottle and syringe upside down (vial above syringe). Pull the plunger to fill the syringe to the desired amount. Check the syringe for air bubbles. If you see any large bubbles, push the plunger until the air is purged out of the syringe. Pull the plunger back down to the desired dose. Remove the needle from the bottle. Be careful to not let the needle touch anything until you are ready to inject.[16]
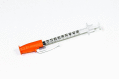
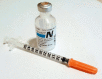
Prefilled syringes can provide greater patient safety by reducing the potential for inadvertent needlesticks and exposure to toxic products that can occur while withdrawing medication from vials. Prefilled syringes, with pre-measured dosage, can reduce dosing errors and waste. They are especially useful during emergent situations that require rapid administration of medication. See Figure 18.13[17] for an image of a prefilled syringe.
Prefilled Syringe
It is important to follow evidence-based practices regarding parenteral medication administration to provide safe and effective care. Evidence-based practices include the following:
Each of these practices is further described in the following sections.
Medication errors can occur at various steps of the medication administration process. It is important to follow a standardized method for parenteral medication administration. Agency policies on medication preparation, administration, and documentation may vary, so it is important to receive agency training on using their medication system to avoid errors. See Table 18.3a for a summary of guidelines for safe medication administration.[1]
Additional details about preventing medication errors can be found in the “Administration of Enteral Medications” chapter.
Summary of Safe Medication Administration Guidelines
| Guidelines | Additional Information |
|---|---|
| Be cautious and focused when preparing medications. | Avoid distractions. Some agencies have a no-interruption zone (NIZ) where health care providers can prepare medications without interruptions.[2] |
| Check and verify allergies. | Always ask the patient about their medication allergies, types of reactions, and severity of reactions. Verify the patient’s medical record for documented allergies. |
| Use two patient identifiers and follow agency policy for patient identification. | Use at least two patient identifiers before administration and compare information against the medication administration record (MAR).[3] |
| Perform appropriate patient assessments before medication administration. | Assess the patient prior to administering medications to ensure the patient is receiving the correct medication, for the correct reason, and at the correct time. For example, a nurse reviews lab values and performs a cardiac assessment prior to administering cardiac medication. See more information regarding specific patient assessments during parenteral medication administration in the “Applying the Nursing Process” section. |
| Be diligent and perform medication calculations accurately. | Double-check and verify medication calculations. Incorrect calculation of medication dosages causes medication errors that can compromise patient safety. |
| Use standard procedures and evidence-based references. | Follow a standardized procedure when administering medication for every patient. Look up current medication information in evidence-based sources because information changes frequently. |
| Communicate with the patient before and after administration. | Provide information to the patient about the medication before administering it. Answer their questions regarding usage, dose, and special considerations. Give the patient an opportunity to ask questions and include family members if appropriate. |
| Follow agency policies and procedures regarding medication administration. | Avoid work-arounds. A work-around is a process that bypasses a procedure or policy in a system. For example, a nurse may “borrow” medication from one patient’s drawer to give to another patient while waiting for an order to be filled by the pharmacy. Although performed with a good intention to prevent delay, these work-arounds fail to follow policies in place that ensure safe medication administration and often result in medication errors. |
| Ensure medication has not expired. | Check all medications’ expiration dates before administering them. Medications can become inactive after their expiration date. |
| Always clarify an order or procedure that is unclear. | Always verify information whenever you are uncertain or unclear about an order. Consult with the pharmacist, charge nurse, or health care provider, and be sure to resolve all questions before proceeding with medication administration. |
| Use available technology to administer medications. | Use available technology, such as bar code scanning, when administering medications. Bar code scanning is linked to the patient’s eMAR and provides an extra level of patient safety to prevent wrong medications, incorrect doses, or wrong timing of administration. If error messages occur, it is important to follow up appropriately according to agency policy and not override them. Additionally, it is important to remember that this technology provides an additional layer of safety and should not be substituted for the checking the five rights of medication administration. |
| Be a part of the safety culture. | Report all errors, near misses, and adverse reactions according to agency policy. Incident reports improve patient care through quality improvement identification, analysis, and problem-solving. |
| Be alert. | Be alert to error-prone situations and high-alert medications. High-alert medications are those that can cause significant harm. The most common high-alert medications are anticoagulants, opiates, insulins, and sedatives. Read more about high-alert medications in the “Administration of Enteral Medications” chapter. |
| Address patient concerns. | If a patient questions or expresses concern regarding a medication, stop the procedure and do not administer it. Explore the patient’s concerns, review the provider’s order, and, if necessary, notify the provider. |
Administering parenteral medications is considered an invasive procedure. It is imperative to take additional measures when administering parenteral medications to prevent health care associated infections. The Centers for Disease Control and Prevention provides several recommendations for safe injection practices to prevent contamination and spread of pathogens. These recommendations include hand hygiene, prevention of needle/syringe contamination, preparation of the patient’s skin, prevention of contamination of the solution, and use of new, sterile equipment for each injection.[4],[5],[6] Each of these recommendations is discussed below.
Always perform hand hygiene before preparing and after administering the injection with facility-approved, alcohol-based hand sanitizer. See more information about performing effective hand hygiene in the “Aseptic Technique” chapter.
Keep the parts of the needle and syringe sterile. Keep the tip of the syringe sterile and keep it covered with a cap or needle. Avoid letting the needle touch unsterile surfaces, such as the outer edges of the ampule or vial, the surface of the needle cap, or the counter. Always keep the needle covered with a cap when not in use and avoid touching the length of the plunger.
After administration, use the scoop-cap method to recap the needle to avoid needlestick injuries and place the used syringe/needle immediately in the sharps container.

Wash the patient’s skin with soap and water if it is soiled. Follow agency policy for skin preparation. When using an alcohol swab, use a circular motion to rub the area for 15 seconds, and then let the area dry for 30 seconds. If cleaning a site, move from the center of the site outward in a 5-cm (2 in.) radius.
Use single-dose vials or ampules whenever possible. Do not keep multi-dose vials in patient treatment areas. Discard a container if sterility is compromised or questionable. Medications from ampules should be used immediately and then discarded appropriately. Additional information about ampules is provided in the “Basic Concepts” section.
Use a new, sterile syringe and needle with each patient. Inspect packaging for intactness and discard if there are rips or torn corners. If single-use equipment is not available, use syringes and needles designed for steam sterilization.
With proper preparation and technique, injections can be given safely and effectively to patients to prevent harm. It is essential to use correct needle sizes and angles of insertion and select appropriate anatomical locations based on patient age, size, and type of injection to avoid complications.[8] For example, for intramuscular injections the ventrogluteal site is preferred in adults because it has the greatest muscle thickness, is free of nerves and blood vessels, and has a small layer of fat, resulting in less painful administration and optimal absorption of the medication.
Use the correct needle length according to the type of injection to ensure delivery of medication into the correct layer of tissue and to reduce complications such as abscesses, pain, and bruising. Needle selection should be based on the patient’s size, gender, and injection site. Be aware that women tend to have more adipose tissue around the buttocks and deltoid fat pad, which means a longer needle is required. Larger diameter (smaller gauge) needles have been found to reduce pain, swelling, and redness after an injection because less pressure is required to depress the plunger.
Removing medication residue on the tip of the needle has been shown to reduce pain and discomfort of the injection. To remove residue from the needle, change needles after medication is removed from a vial and before it is administered to the patient. Additionally, place the bevel side of the needle up on the patient’s skin for quick and smooth injection of the needle into the tissue.
Proper positioning of the patient will facilitate proper landmarking of the site and may reduce perception of pain from the injection. Position the patient’s limbs in a relaxed, comfortable position to reduce muscle tension. For example, when giving an intramuscular injection in the deltoid, have the patient relax their arm by placing their hand in their lap.
The nurse can also encourage relaxation techniques to help decrease the patient’s anxiety-heightened pain. For example, divert the patient’s attention away from the injection procedure by chatting about other topics.[9]
Nurses are at high risk for needlestick injuries when administering injections. Needlestick injuries can result in the transmission of blood-borne pathogens and should always be reported according to agency policy for appropriate follow-up. Table 18.3b outlines guidelines for preventing needlestick injuries.[10]
Guidelines for Preventing Needlestick Injuries
| Practice Guidelines | Additional Information |
|---|---|
| Do not recap needles with both hands. | Recapping needles with two hands creates high risk for needlestick injuries. Use the scoop-cap method by laying the cap on a hard surface and using one hand to hold the syringe and scoop up the cap from the surface. Whenever possible, use devices with safety features such as a safety shield on needles so that recapping is not necessary. |
| Dispose of the needle immediately after injection. | Immediately dispose of used needles in an approved sharps disposal container that is puncture-proof and leakproof. |
| Reduce or eliminate all hazards related to needles. | Use a needleless system and engineered safety devices for prevention of needlestick injuries when preparing injectable medications whenever possible. |
| Plan disposal of sharps before injection. | Plan for the safe handling and disposal of needles and other sharp objects before beginning the procedure. Locate the sharps container before administration, so that you can quickly dispose of the sharps after injection. |
| Follow all standard policies related to prevention or treatment of injury. | Follow all agency policies regarding infection control, hand hygiene, standard precautions, and blood and body fluid exposure management. |
| Report all injuries. | Report all needlestick injuries and sharp-related injuries immediately. Know how to manage needlestick injuries and follow agency policy regarding exposure to blood-borne pathogens. These policies help decrease the risk of contracting a blood-borne illness. |
| Participate in required training and education. | Attend training on injury-prevention strategies related to needles and safety devices per agency policy. |
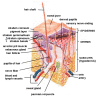
Intradermal injections (ID) are administered into the dermis just below the epidermis. See Figure 18.14[1] for an image of the layers of the skin. Intradermal (ID) injections have the longest absorption time of all parenteral routes because there are fewer blood vessels and no muscle tissue. These types of injections are used for sensitivity testing because the patient’s reaction is easy to visualize and the degree of reaction can be assessed. Examples of intradermal injections include tuberculosis (TB) and allergy testing.[2]
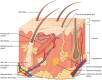
Layers of Skin
The most common anatomical sites used for intradermal injections are the inner surface of the forearm and the upper back below the scapula. The nurse should select an injection site that is free from lesions, rashes, moles, or scars that may alter the visual inspection of the test results. See Figure 18.15[3] for an image of the nurse inspecting a patient’s forearm site prior to injection.
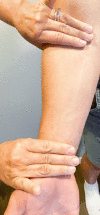
Inspecting the Forearm Site Prior to Injection
Clean the site with an alcohol swab or antiseptic swab for 30 seconds using a firm, circular motion. Allow the site to dry. Allowing the skin to dry prevents introducing alcohol into the tissue, which can be irritating and uncomfortable.[4]
Use a tuberculin syringe, calibrated in tenths and hundredths of a milliliter, with a needle length of 1/4 inches to 1/2 inches and a gauge of 26 or 27.[5] See Figure 18.16[6] for an image of a tuberculin syringe. Remove the cap from the needle by pulling it off in a straight motion. A straight motion helps prevent needlestick injury.
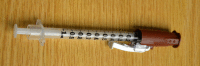
Tuberculin Syringe
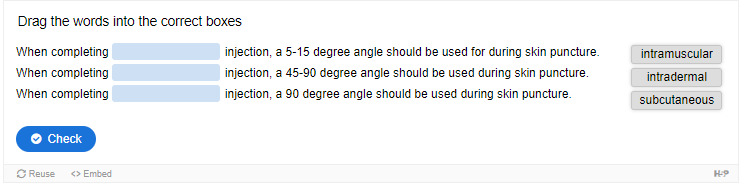
The dosage of an intradermal injection is usually under 0.5 mL, and the angle of administration for an ID injection is 5 to 15 degrees. Using your nondominant hand, spread the skin taut over the injection site. Taut skin provides easy entrance for the needle and is also important to do for older adults, whose skin is less elastic. See Figure 18.17[7] of an image of a nurse holding the skin taut prior to injection.[8]
Holding Skin Taut
Hold the syringe in the dominant hand between the thumb and forefinger, with the bevel of the needle up at a 5- to 15-degree angle at the selected site. Place the needle almost flat against the patient’s skin, bevel side up, and insert the needle into the skin. Keeping the bevel side up allows for smooth piercing of the skin and induction of the medication into the dermis. Advance the needle no more than an eighth of an inch to cover the bevel. Once the syringe is in place, use the thumb of the nondominant hand to push on the plunger to slowly inject the medication.[9] See Figure 18.18[10] for an image of a nurse administering an intradermal injection.
Intradermal Injection
After the ID injection is completed, a bleb (small blister) should appear under the skin. The presence of the bleb indicates that the medication has been correctly placed in the dermis. See Figure 18.19[11] for an image of a bleb.
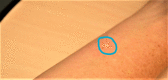
Bleb
Carefully withdraw the needle out of the insertion site using the same angle it was placed so as not to disturb the bleb. Withdrawing at the same angle as insertion also minimizes discomfort to the patient and damage to the tissue. Do not massage or cover the site. Massaging the area may spread the solution to the underlying subcutaneous tissue. Discard the syringe in the sharps container. If administering a TB test, advise the patient to return for a reading in 48-72 hours. Discard used supplies, remove gloves, perform hand hygiene, and document.[12]
Subcutaneous injections are administered into the adipose tissue layer called “subcutis” below the dermis. See an image of the subcutis (hypodermis) layer in Figure 18.20.[1] Medications injected into the subcutaneous layer are absorbed at a slow and steady rate.
Subcutis Layer of Skin
Sites for subcutaneous injections include the outer lateral aspect of the upper arm, the abdomen (from below the costal margin to the iliac crest and more than two inches from the umbilicus), the anterior upper thighs, the upper back, and the upper ventral gluteal area.[2] See Figure 18.21[3] for an illustration of commonly used subcutaneous injection sites. These areas have large surface areas that allow for rotation of subcutaneous injections within the same site when applicable.
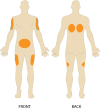
Common Subcutaneous Injection Sites
Prior to injecting the medication, inspect the skin area. Avoid skin areas that are bruised, open, scarred, or over bony prominences. Medical conditions that impair the blood flow to a tissue area contraindicate the use of subcutaneous injections in that area. For example, if a patient has an infection in an area of their skin called “cellulitis,” then subcutaneous injections should not be given in that area.
Nurses select the appropriate needle size for subcutaneous injection based on patient size. Subcutaneous needles range in gauge from 25-31 and in length from ½ inch to ⅝ inch. Prior to administering the injection, determine the amount of subcutaneous tissue present and use this information to select the needle length. A 45- or 90-degree angle is used for a subcutaneous injection. A 90-degree angle is used for normal-sized adult patients or obese patients, and a 45-degree angle is used for patients who are thin or have with less adipose tissue at the injection site. The volume of solution in a subcutaneous injection should be no more than 1 mL for adults and 0.5 mL for children. Larger amounts may not be absorbed appropriately and may cause increased discomfort for the patient.[4]
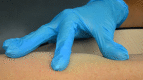
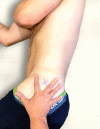
When administering a subcutaneous injection, assess the patient for any contraindications for receiving the medication. Apply nonsterile gloves after performing hand hygiene to reduce your risk of exposure to blood. Position the patient in a comfortable position and select an appropriate site for injection. Cleanse the site with an alcohol swab or antiseptic swab for 30 seconds using a firm, circular motion, and then allow the site to dry. Allowing the skin to dry prevents introducing alcohol into the tissue, which can be irritating and uncomfortable. Remove the needle cap with the nondominant hand, pulling it straight off to avoid needlestick injury. Grasp and pinch the area selected as an injection site.[5] See Figure 18.22[6] for an image of a nurse grasping the back of a patient’s upper arm with the nondominant hand in preparation of a subcutaneous injection at the anatomical site indicted with an “X.”
Grasping and Pinching Area
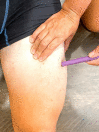
Hold the syringe in the dominant hand between the thumb and forefinger like a dart. Insert the needle quickly at a 45- to 90-degree angle, depending on the size of the patient and the amount of adipose tissue. After the needle is in place, release the tissue with your nondominant hand. With your dominant hand, inject the medication at a rate of 10 seconds per mL. Avoid moving the syringe.[7] See Figure 18.23[8] for an image of a subcutaneous injection.
Subcutaneous Injection

When injecting heparin or when using an insulin pen, continue pinching the skin during the injection and release the skinfold immediately before withdrawing the needle.
Withdraw the needle quickly at the same angle at which it was inserted. Using a sterile gauze, apply gentle pressure at the site after the needle is withdrawn. Do not massage the site. Massaging after a heparin injection can contribute to the formation of a hematoma. Do not recap the needle to avoid puncturing oneself. Apply the safety shield and dispose of the syringe/needle in a sharps container. See Figure 18.24[9] for an image of a needle after the safety shield has been applied. Remove gloves and perform hand hygiene.[10]

Needle with Safety Shield Applied
Examples of common medications administered via subcutaneous injection include insulin and heparin. Special considerations for each of these medications are discussed below.
Insulin is considered a high-alert medication requiring special care to prevent medication errors. Care must be taken to ensure the correct type and amount of insulin are administered at the correct time. It is highly recommended to have insulin dosages double-checked by another nurse before administration because of the potential for life-threatening adverse effects that can occur due to medication errors. Some agencies require this second safety check.
Only insulin syringes should be used to administer insulin injection. Insulin syringes are supplied in 30-, 50-, or 100-unit measurements, so read the barrel increments (calibration) carefully. Insulin is always ordered and administered in unit dosage. Insulin dosage may be based on the patient’s pre-meal blood sugar reading and a sliding scale protocol that indicates the number of units administered based on the blood sugar reading.[11],[12]
There are rapid-, short-, intermediate-, and long-acting insulins. For each type of insulin, it is important to know the onset, peak, and duration of the insulin so that it can be timed appropriately with the patient’s food intake. It is essential to time the administration of insulin with food intake to avoid hypoglycemia. When administering insulin before a meal, always ensure the patient is not nauseated and is able to eat. Short- or rapid-acting insulin may be administered up to 15-30 minutes before meals. Intermediate insulin is typically administered twice daily, at breakfast and dinner, and long-acting insulin is typically administered in the evening.[13],[14]
When administering cloudy insulin preparations such as NPH insulin (Humulin-N), gently roll the vial between the palms of your hands to resuspend the medication before withdrawing it from the vial.[15],[16] See Figure 18.25[17] for an image of insulin NPH that is cloudy in color.
NPH Insulin
When withdrawing insulin from a vial, check the insulin vial to make sure it is the right kind of insulin and that there are no clumps or particles in it. Also, make sure the insulin is not past its expiration date. Pull air into the syringe to match the amount of insulin you plan to remove. Hold the syringe like a pencil and insert the needle into the rubber stopper on the top of the vial. Push the plunger down until all of the air is in the bottle. This helps to keep the right amount of pressure in the bottle and makes it easier to draw up the insulin. With the needle still in the vial, turn the bottle and syringe upside down (vial above syringe). Pull the plunger to fill the syringe to the desired amount. Check the syringe for air bubbles. If you see any large bubbles, push the plunger until the air is purged out of the syringe. Pull the plunger back down to the desired dose. Remove the needle from the bottle. Be careful to not let the needle touch anything until you are ready to inject.[18]
If a patient is ordered two types of insulin, some insulins may be mixed together in one syringe. For example, insulin NPH (Novolin-N) can be mixed with insulin regular (Humulin-R), insulin aspart (Novolog), or insulin lispro (Humalog). However, some types of insulin cannot be mixed with other insulin, such as insulin glargine (Lantus) or insulin detemir (Levemir).[19],[20]
When mixing insulin, gather your insulin supplies. Check the insulin vials to make sure they are the right kinds of insulin, there are no clumps or particles in them, and the expiration dates have not passed. Gently mix intermediate or premixed insulin by turning the vial on its side and rolling it between the palms of your hands. Prepare the insulin vials by injecting air into the intermediate insulin vial. Remove the cap from the needle. With the vial of insulin below the syringe, inject an amount of air equal to the dose of intermediate insulin that you will be taking. Do not draw out the insulin into the syringe yet. Remove the needle from the vial. Inject air into the rapid-acting insulin vial equal to the rapid-acting insulin dose. With the needle still in the vial, turn the vial upside down (vial above the syringe) and pull the plunger to fill the syringe with the desired dose. Check the syringe for air bubbles. If you see any large bubbles, push the plunger until the air is purged out of the syringe. Pull the plunger back down to the desired dose. Remove the needle from the vial and recheck your dose. Insert the needle into the vial of cloudy insulin. Turn the vial upside down (vial above syringe) and pull the plunger to draw the dose of intermediate-acting insulin. Because the short-acting insulin is already in the syringe, pull the plunger to the total number of units you need. Do not inject any of the insulin back into the vial because the syringe now contains a mixture of intermediate- and rapid-acting insulin. Remove the needle from the vial and be careful to not let the needle touch anything until you are ready to inject.[21]
When mixing insulin, it is important to always draw up the short-acting insulin first to prevent it from being contaminated with the long-acting insulin. See Figure 18.26[22] for an illustration of the order to follow when mixing insulin.
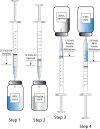
Mixing Insulin
One anatomic region should be selected for a patient’s insulin injections to maintain consistent absorption, and then sites should be rotated within that region. The abdomen absorbs insulin the fastest, followed by the arms, thighs, and buttocks. It is no longer necessary to rotate anatomic regions, as was once done, because newer insulins have a lower risk for causing hypertrophy of the skin.[23],[24]

Insulin pens are a newer technology designed to be used multiple times for a single person, using a new needle for each injection. See Figure 18.27[26] for an image of an insulin pen. Insulin pens must never be used for more than one person. Regurgitation of blood into the insulin cartridge can occur after injection, creating a risk of blood-borne pathogen transmission if the pen is used for more than one person, even when the needle is changed.[27] Prefilled insulin pens consist of a prefilled cartridge of insulin to which a special, single-use needle is attached. When using an insulin pen for subcutaneous insulin administration, a few additional steps must be taken according to manufacturer guidelines. The needle should be primed with two units of insulin, and then the dosage should be dialed in the dose window. The pen should be held with the hand using four fingers so that the thumb can be used to fully depress the plunger button. The pen should be left in place for ten seconds after the insulin is injected to aid in absorption.[28]
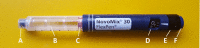
Insulin Pen A) tip, B) medication chamber, C) plunger, D) dose window, E) dose selection dial, F) plunger button
Insulin pens are often prescribed for home use because of their ease of use. Patients and family members must be educated on how to correctly use an insulin pen before discharge. To evaluate a patient’s knowledge of how to correctly administer insulin, ask them to “return demonstrate” the procedure to you.[29],[30]
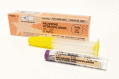
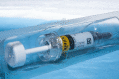
Heparin is an anticoagulant medication used to treat or prevent blood clots. It comes in various strengths and can be administered subcutaneously or intravenously. Heparin is also considered a high-alert medication because of the potential life-threatening harm that can result from a medication error. See Figure 18.28[33] for an image of a prefilled syringe of enoxaparin (Lovenox), a low-molecular weight heparin, that is typically dispensed in prefilled syringes. Review specific guidelines regarding heparin administration in Table 18.5.[34]
Low-Molecular Weight Heparin
Specific Guidelines for Administering Heparin[35]
| Guidelines | Additional Information |
|---|---|
| Remember that heparin is considered a high-alert medication. | Heparin is available in vials and prefilled syringes in a variety of concentrations. Because of the dangerous adverse effects of the medication, it is considered a high-alert medication. Always follow agency policy regarding the preparation and administration of heparin. |
| Rotate heparin injection sites. | It is important to rotate heparin sites to avoid bruising in one location. Heparin is absorbed best in the abdominal area, at least 2 inches (5 cm.) away from the umbilicus. |
| Know the risks associated with heparin. | There are many risks associated with the administration of heparin, including bleeding, hematuria, hematemesis, bleeding gums, and melena. Monitor, document, and report these side effects when a patient is receiving heparin. |
| Review lab values. | Review lab values (PTT and aPTT) before and after heparin administration. If injecting low-molecular weight heparin (enoxaparin), review platelet count because heparin can cause thrombocytopenia. |
| Follow administration standards for prepackaged heparin and enoxaparin syringes. | Many agencies use prepackaged heparin and enoxaparin syringes. Always follow the standards for safe medication administration when using prefilled syringes. |
| Assess patient conditions prior to administration. | Some medical conditions increase the patient’s risk for hemorrhage (severe bleeding), such as recent childbirth, severe kidney and liver disease, cerebral or aortic aneurysm, and cerebral vascular accidents (CVA). |
| Assess other medications and diet. | Over-the-counter (OTC) herbal medications, such as garlic, ginger, and horse chestnut, may interact with heparin. Additional medications that may interact or cause increased risk of bleeding include aspirin, NSAIDs, cephalosporins, antithyroid agents, thrombolytics, and probenecids. Foods like green leafy vegetables can alter the therapeutic effect of heparin. |
A jet injector is a medical device used for vaccinations and other subcutaneous injections that uses a high-pressure, narrow stream of fluid to penetrate the skin instead of a hypodermic needle. An example of a flu vaccine approved for administration to adults aged 18-64 is AFLURIA © Quadrivalent. The most common injection-site adverse reactions of the jet injector flu vaccine up to seven days post-vaccination were tenderness, swelling, pain, redness, itching, and bruising.[36] Insulin can also be successfully administered via a jet injector, with research demonstrating improved glucose control because the insulin is spread out over a larger area of tissue and enters the bloodstream faster than when administered by an insulin pen or needle. Patients have indicated preference for insulin delivered by the jet injector compared to the insulin pen or syringe because it is needle-free with less tissue injury and pain as compared to the needle injection.[37] See Figure 18.29[38] for an image comparing insulin delivery devices.
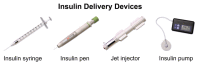
Insulin Delivery Devices
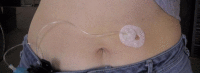
Another type of new technology used to continuously deliver subcutaneous insulin is the insulin pump. Pumps are a computerized device attached to the body, either with tubing or attached to the skin. They are programmed to release small doses of insulin (continuously or as a surge bolus dose) close to mealtime to control the rise in blood sugar after a meal. They work by closely mimicking the body’s normal release of insulin. Insulin doses are delivered through a flexible plastic tube called a catheter. With the aid of a small needle, the catheter is inserted through the skin into the fatty tissue and is taped in place.[39] See Figure 18.30[40] for an image of an insulin pump infusion set attached to a patient.
Insulin Pump
The intramuscular (IM) injection route is used to place medication in muscle tissue. Muscle has an abundant blood supply that allows medications to be absorbed faster than the subcutaneous route.
Factors that influence the choice of muscle to use for an intramuscular injection include the patient’s size, as well as the amount, viscosity, and type of medication. The length of the needle must be long enough to pass through the subcutaneous tissue to reach the muscle, so needles up to 1.5 inches long may be selected. However, if a patient is thin, a shorter needle length is used because there is less fat tissue to advance through to reach the muscle. Additionally, the muscle mass of infants and young children cannot tolerate large amounts of medication volume. Medication fluid amounts up to 0.5-1 mL can be injected in one site in infants and children, whereas adults can tolerate 2-5 mL. Intramuscular injections are administered at a 90-degree angle. Research has found administering medications at 10 seconds per mL is an effective rate for IM injections, but always review the drug administration rate per pharmacy or manufacturer’s recommendations.[1]
Anatomic sites must be selected carefully for intramuscular injections and include the ventrogluteal, vastus lateralis, and the deltoid. The vastus lateralis site is preferred for infants because that muscle is most developed. The ventrogluteal site is generally recommended for IM medication administration in adults, but IM vaccines may be administered in the deltoid site. Additional information regarding injections in each of these sites is provided in the following subsections.
This site involves the gluteus medius and minimus muscle and is the safest injection site for adults and children because it provides the greatest thickness of gluteal muscles, is free from penetrating nerves and blood vessels, and has a thin layer of fat. To locate the ventrogluteal site, place the patient in a supine or lateral position. Use your right hand for the left hip or your left hand for the right hip. Place the heel or palm of your hand on the greater trochanter, with the thumb pointed toward the belly button. Extend your index finger to the anterior superior iliac spine and spread your middle finger pointing towards the iliac crest. Insert the needle into the “V” formed between your index and middle fingers. This is the preferred site for all oily and irritating solutions for patients of any age.[2] See Figure 18.31[3] for an image demonstrating how to accurately locate the ventrogluteal site using your hand.

Locating the Ventrogluteal Site
The needle gauge used at the ventrogluteal site is determined by the solution of the medication ordered. An aqueous solution can be given with a 20- to 25-gauge needle, whereas viscous or oil-based solutions are given with 18- to 21-gauge needles. The needle length is based on patient weight and body mass index. A thin adult may require a 5/8-inch to 1-inch (16 mm to 25 mm) needle, while an average adult may require a 1-inch (25 mm) needle, and a larger adult (over 70 kg) may require a 1-inch to 1½-inch (25 mm to 38 mm) needle. Children and infants require shorter needles. Refer to agency policies regarding needle length for infants, children, and adolescents. Up to 3 mL of medication may be administered in the ventrogluteal muscle of an average adult and up to 1 mL in children. See Figure 18.32[4] for an image of locating the ventrogluteal site on a patient.
Ventrogluteal Site
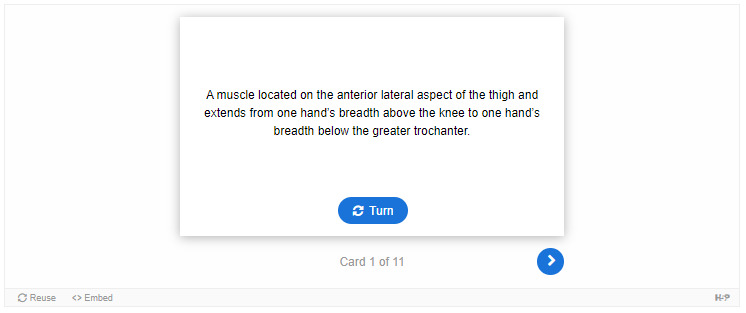
The vastus lateralis site is commonly used for immunizations in infants and toddlers because the muscle is thick and well-developed. This muscle is located on the anterior lateral aspect of the thigh and extends from one hand’s breadth above the knee to one hand’s breadth below the greater trochanter. The outer middle third of the muscle is used for injections. To help relax the patient, ask the patient to lie flat with knees slightly bent or have the patient in a sitting position. See Figure 18.33[5] for an image of the vastus lateralis injection site.

Vastus Lateralis Site
The length of the needle used at the vastus lateralis site is based on the patient’s age, weight, and body mass index. In general, the recommended needle length for an adult is 1 inch to 1 ½ inches (25 mm to 38 mm), but the needle length is shorter for children. Refer to agency policy for pediatric needle lengths. The gauge of the needle is determined by the type of medication administered. Aqueous solutions can be given with a 20- to 25-gauge needle; oily or viscous medications should be administered with 18- to 21-gauge needles. A smaller gauge needle (22 to 25 gauge) should be used with children. The maximum amount of medication for a single injection in an adult is 3 mL. See Figure 18.34[6] for an image of an intramuscular injection being administered at the vastus lateralis site.
Intramuscular Injection at Vastus Lateralis Site
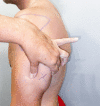
The deltoid muscle has a triangular shape and is easy to locate and access. To locate the injection site, begin by having the patient relax their arm. The patient can be standing, sitting, or lying down. To locate the landmark for the deltoid muscle, expose the upper arm and find the acromion process by palpating the bony prominence. The injection site is in the middle of the deltoid muscle, about 1 inch to 2 inches (2.5 cm to 5 cm) below the acromion process. To locate this area, lay three fingers across the deltoid muscle and below the acromion process. The injection site is generally three finger widths below in the middle of the muscle. See Figure 18.35[7] for an illustration for locating the deltoid injection site.
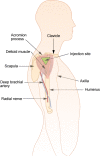
Locating the Deltoid Injection Site
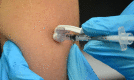
Select the needle length based on the patient’s age, weight, and body mass. In general, for an adult male weighing 60 kg to 118 kg (130 to 260 lbs), a 1-inch (25 mm) needle is sufficient. For women under 60 kg (130 lbs), a ⅝-inch (16 mm) needle is sufficient, while for women between 60 kg and 90 kg (130 to 200 lbs) a 1-inch (25 mm) needle is required. A 1 ½-inch (38 mm) length needle may be required for women over 90 kg (200 lbs) for a deltoid IM injection. For immunizations, a 22- to 25-gauge needle should be used. Refer to agency policy regarding specifications for infants, children, adolescents, and immunizations. The maximum amount of medication for a single injection is generally 1 mL. See Figure 18.36[8] for an image of locating the deltoid injection site on a patient.
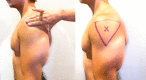
The Deltoid Injection Site
When administering an intramuscular injection, the procedure is similar to a subcutaneous injection, but instead of pinching the skin, stabilize the skin around the injection site with your nondominant hand. With your dominant hand, hold the syringe like a dart and inject the needle quickly into the muscle at a 90-degree angle using a steady and smooth motion. After the needle pierces the skin, use the thumb and forefinger of the nondominant hand to hold the syringe. If aspiration is indicated according to agency policy and manufacturer recommendations, pull the plunger back to aspirate for blood. If no blood appears, inject the medication slowly and steadily. If blood appears, discard the syringe and needle and prepare the medication again. See Figure 18.37[9] for an image of aspirating for blood. After the medication is completely injected, leave the needle in place for ten seconds, then remove the needle using a smooth, steady motion. Remove the needle at the same angle at which it was inserted. Cover the injection site with sterile gauze using gentle pressure and apply a Band-Aid if needed.[10]
Aspirating for Blood
Because the injection sites recommended for immunizations do not contain large blood vessels, the CDC recommends there is no longer the need to aspirate when administering vaccines.[11]
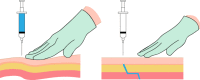
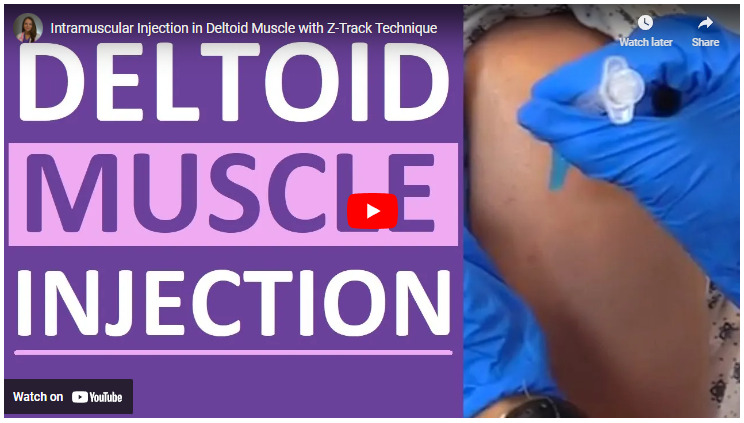
Evidence-based practice supports using the Z-track method for administration of intramuscular injections. This method prevents the medication from leaking into the subcutaneous tissue, allows the medication to stay in the muscles, and can minimize irritation.[12]
The Z-track method creates a zigzag path to prevent medication from leaking into the subcutaneous tissue. This method may be used for all injections or may be specified by the medication.
Displace the patient’s skin in a Z-track manner by pulling the skin down or to one side about 1 inch (2 cm) with your nondominant hand before administering the injection. With the skin held to one side, quickly insert the needle at a 90-degree angle. After the needle pierces the skin, continue pulling on the skin with the nondominant hand, and at the same time, grasp the lower end of the syringe barrel with the fingers of the nondominant hand to stabilize it. Move your dominant hand and pull the end of the plunger to aspirate for blood, if indicated. If no blood appears, inject the medication slowly. Once the medication is given, leave the needle in place for ten seconds. After the medication is completely injected, remove the needle using a smooth, steady motion, and then release the skin. See Figure 18.38[13] for an illustration of the Z-track method.
Z-track Method

When administering any parenteral injection, the nurse assesses the patient prior to administration for safe medication administration. See Table 18.7 to review assessments prior to medication administration.
Assessments Prior to Injection Administration
| Assessment | Rationale/Considerations |
|---|---|
| Check the MAR with the written medication prescription for accuracy and completeness. | Prevent medication errors. |
| Perform the rights of medication administration, including patient’s name, medication name and dose, route, time of administration, and verify the expiration date. Label syringes with medication names as you prepare them. | Prevent medication errors. Discard medication if expired. Label syringes during the procedure to administer medications safely according to the Joint Commission.[1] |
| Assess and review a patient’s current medical condition, past medical history, and medication history. | Identify the need for the medication, as well as any possible contraindications for the administration of prescribed medication to the specific patient. |
| Assess the patient’s history of medication allergies or nondrug allergies that may interfere with the medication. If there is a history of allergic reactions, document the type of reaction if possible (e.g., hives, rash, swelling, difficulty breathing). If there is an allergy to prescriber medication, do not prepare it and notify the prescribing provider. | Safely administer medication. |
| Review a current, evidence-based drug reference to determine medication action, indication for medication, normal dosage range, and potential side effects. Identify peak and onset times, as well as any nursing considerations. | Safely administer medication and plan to monitor the patient’s response. For example, by knowing the peak onset of fast-acting insulin, the nurse anticipates when the patient may be most at risk for a hypoglycemic reaction. |
| Review and assess pertinent laboratory results (i.e., blood glucose, prothrombin times). Be aware of abnormal kidney and liver function results because they may affect metabolism of medication. Notify the prescriber of any concerns. | Collect data to determine if the medication should be withheld to ensure proper dosage and to establish a baseline for measuring the patient’s response to the drug. |
| Observe the patient’s verbal and nonverbal reactions to the injection. | Be aware of the patient’s level of anxiety and use distractions and other therapeutic techniques to reduce pain and anxiety. |
| Perform patient assessments, such as vital signs, lung sounds, or pain level, as indicated, prior to medication administration. | Obtain baseline data to ensure medication administration is appropriate at this time and to establish a baseline for measuring the patient’s response to the medication. |
| Assess for contraindications to subcutaneous or intramuscular injections such as muscle atrophy or decreased blood flow to the tissue. | Assess for contraindications because reduced muscle and blood flow interfere with the drug absorption and distribution. |
| Assess the patient’s knowledge of the medication. | Perform patient education about the medication as needed. |
| Assess the skin and tissue quality around the area of the intended injection site. Note any bruising, nonintact skin, abrasions, masses, or scar tissue. Avoid these areas and choose another recommended location. | Assess skin and tissue quality to avoid unnecessary or further injury to the already compromised skin integrity. Areas that are scarred or atrophied can affect the absorption and distribution of the medication. |
Nurses evaluate for possible complications of parenteral medication administration that may occur as a result of a medication error or as an adverse reaction. Complications may occur if a medication is prepared incorrectly, if the medication is injected incorrectly, or if an adverse effect occurs after the medication is injected. Unexpected outcomes can occur such as nerve or tissue damage, ineffective absorption of the medication, pain, bleeding, or infection.
An adverse reaction may develop as a result of an injected medication. An adverse reaction may also occur despite appropriate administration of medication and can happen for various reasons. A reaction may be evident within minutes or days after the exposure to the injectable medication. An unexpected outcome may range from a minor reaction, like a skin rash, to serious and life-threatening events such as anaphylaxis, hemorrhaging, and even death.
If a suspected complication occurs during administration, immediately stop the injection. Assess and monitor vital signs, notify the health care provider, and document an incident report.
Use the checklist below to review the steps for completion of “Parenteral Site Identification.”
Directions: Identify parenteral injection sites, needle size/gauge, injection angle, and the appropriate amount that can be administered in each of the parenteral routes: intradermal, subcutaneous, and intramuscular.
Describe the appropriate needle gauge, length, number of cc’s, and angle for an intradermal injection:
Demonstrate locating the intradermal injection sites on a peer:
Describe the appropriate needle gauge, length, number of mL, and angle for a subcutaneous injection:
Demonstrate locating the subcutaneous injection sites on a peer:
Describe the appropriate needle gauge, length, number of mL, and angle for an adult intramuscular:
Demonstrate locating the intramuscular injection sites on a peer:
Explain how you would modify assessment techniques to reflect variations across the life span and body size variations.
Use the checklist below to review the steps for completion of “Parenteral Medication Injections.”
Disclaimer: Always review and follow agency policy regarding this specific skill.
Special Considerations:
Check the orders and MAR for accuracy and completeness; clarify any unclear orders.
Review pertinent information related to the medications: labs, last time medication was given, and medication information: generic name, brand name, dose, route, time, class, action, purpose, side effects, contraindications, and nursing considerations.
Gather available supplies: correctly sized syringes and needles appropriate for medication, patient’s size, and site of injection; diluent (if required); tape or patient label for each syringe; nonsterile gloves; sharps container; and alcohol wipes.
Perform hand hygiene.
While withdrawing medication from the medication dispensing system, perform the first check of the six rights of medication administration. Check expiration date and perform any necessary calculations.
Select the correct type of syringe and needle size appropriate for the medication, patient size, and site of injection.
7. Scrub the top of the vial of the correct medication. State the correct dose to be drawn.
8. Remove the cap from the needle. Pull back on the plunger to draw air into the syringe equal to the dose.
9. With the vial on a flat surface, insert the needle. Invert the vial and withdraw the correct amount of the medication. Expel any air bubbles. Remove the needle from the vial.
10. Using the scoop method, recap the needle.
11. Perform the second check of the six rights of medication administration, looking at the vial, syringe, and MAR.
12. Label the syringe with the name of the drug and dose.
Additional Preparation Steps When Mixing Two Types of Insulin in One Syringe
Intermediate-Acting (NPH) and Short-Acting (Regular) insulins
Place the vials side by side on a flat surface: NPH on left and regular insulin on the right.
With an alcohol pad, scrub off the vial top of the NPH insulin. Using a new alcohol pad, scrub the vial top of the regular insulin. Discard any prep pads.
Select the correct insulin syringe that will exactly measure the TOTAL dose of the amount of NPH and regular doses (30- and 50-unit syringes measure single units; 100-unit syringes only measure even numbered doses).
Pull back on the plunger to draw air into the syringe equal to the dose of NPH insulin.
With the NPH vial on a flat surface, remove the cap from the syringe, insert the needle into the NPH vial, and inject air. Do not let the tip of the needle touch the insulin solution. Withdraw the needle.
Pull back on the plunger to draw air into the syringe equal to the dose of the regular insulin.
With the regular vial on a flat surface, remove the cap from the syringe, insert the needle into the regular vial, and inject air.
With the needle still in the vial, invert the regular insulin vial and withdraw the correct dose. Remove the needle from the vial. Cap the needle using the scoop method.
Roll the NPH insulin vial between your hands to mix the solution. Uncap the needle and insert the needle into the NPH insulin vial. Withdraw the correct amount of NPH insulin. Withdraw the needle and recap using the scoop method.
Perform the second medication check of the combined dose looking at the vial, syringe, and MAR, verifying all the rights.
Label the syringe with the name of the combined medications and doses.
Alternative Preparation Using an Insulin Pen
Select the correct insulin pen to be used for the injection. Identify the dose to be given.
Remove the cap from the insulin pen and clean the top (hub) with an alcohol prep pad. Attach the insulin pen needle without contaminating the needle or pen hub.
Turn the dial to two units and push the injection button to prime the pen.
Turn the dial to the correct dose.
Perform the second medication check looking at the insulin pen and MAR, verifying all the rights.
13. Knock, enter the room, greet the patient, and provide for privacy.
14. Perform safety steps:
Perform the third check of the six rights of medication administration at the patient’s bedside after performing patient identification.
Perform the following steps according to the type of parenteral medication.
INTRADERMAL – Administration of a TB Test
Correctly identify the sites and verbalize the landmarks used for intradermal injections.
Select the correct site for the TB test, verbalizing the anatomical landmarks and skin considerations.
Put on nonsterile gloves if contact with blood or body fluids is likely or if your skin or the patient’s skin isn’t intact.
Use an alcohol swab in a circular motion to clean the skin at the site; place the pad above the site to mark the site, if desired.
Using the nondominant hand, gently pull the skin away from the site.
Insert the needle with the bevel facing upward, slowly at a 5- to 15-degree angle, and then advance no more than an eighth of an inch to cover the bevel.
Use the thumb of the nondominant hand to push on the plunger to slowly inject the medication. Inspect the site, noting if a small bleb forms under the skin surface.
Carefully withdraw the needle straight back out of the insertion site so not to disturb the bleb (do not massage or cover the site).
Activate the safety feature of the needle and place the syringe in the sharps container.
Teach the patient to return for a TB skin test reading in 48-72 hours and not to press on the site or apply a Band-Aid.
SUBCUTANEOUS – Administration of Insulin in a Syringe
Correctly identify the sites and verbalize the landmarks used for subcutaneous injections. Ask the patient regarding a preferred site of medication administration.
Put on nonsterile gloves if contact with blood or body fluids is likely or if your skin or the patient’s skin isn’t intact.
Select an appropriate site and clean with an alcohol prep in a circular motion. Place the pad above the site to mark the location, if desired. Remove the cap from the needle without contaminating the needle.
Pinch approximately an inch of subcutaneous tissue, creating a skinfold.
Inject the needle at 90-degree angle, release the patient’s skin, and inject the medication. Withdraw the needle.
Activate the safety feature of the needle and place the syringe in a sharps container.
SUBCUTANEOUS – Administration with an Insulin Pen
Select the site and clean with an alcohol prep in a circular motion. Place the pad above the site to mark the location, if desired. Remove the cap from the needle without contaminating the needle.
Put on nonsterile gloves if contact with blood or body fluids is likely or if your skin or the patient’s skin isn’t intact.
Pinch approximately an inch of subcutaneous tissue, creating a skinfold.
Inject the needle quickly at a 90-degree angle, continue to hold the skinfold, and inject the medication. After the medication is injected, count to 10, remove the needle, and release the skinfold.
Dispose of the needle in a sharps container. Replace the top cap to the insulin pen.
INTRAMUSCULAR – Deltoid
Correctly identify the site and verbalize the landmarks used for a deltoid injection.
Put on nonsterile gloves if contact with blood or body fluids is likely or if your skin or the patient’s skin isn’t intact.
Use an alcohol swab in a circular motion to clean the skin at the site. Place a pad above the site to mark the location. Remove the cap from the needle without contaminating the needle.
Depending on the muscle mass of the deltoid, either grasp the body of the muscle between the thumb and forefingers of the nondominant hand or spread the skin taut.
Inject the needle at a 90-degree angle.
Follow agency policy and manufacturer recommendations regarding aspiration.
Continue to hold the muscle fold and inject the medication. After the medication is injected, count to 10, remove the needle, and release the muscle fold.
Activate the safety on the syringe. Place the syringe in a sharps container.
INTRAMUSCULAR – Vastus Lateralis
Correctly identify the site and verbalize the landmarks to locate the vastus lateralis site.
Put on nonsterile gloves if contact with blood or body fluids is likely or if your skin or the patient’s skin isn’t intact.
Use an alcohol swab in a circular motion to clean the skin at the site. Place the pad above the site to mark the location. Remove the cap from the needle without contaminating the needle.
Depending on the muscle mass of the vastus lateralis, either grasp the body of the muscle between the thumb and forefingers of the nondominant hand or spread the skin taut.
Inject the needle at a 90-degree angle.
Follow agency policy and manufacturer recommendations regarding aspiration.
Continue to hold the muscle fold and inject the medication. After the medication is injected, count to 10, remove the needle, and release the muscle fold.
Activate the safety on the syringe. Put the needle in a sharps container.
INTRAMUSCULAR – Ventrogluteal (Using the Z-track Technique)
Correctly identify and verbalize the landmarks used to locate the ventrogluteal site.
Put on nonsterile gloves if contact with blood or body fluids is likely or if your skin or the patient’s skin isn’t intact.
Use an alcohol swab in a circular motion to clean the skin at the site and place a pad above the site to mark the location. Remove the cap from the needle without contaminating the needle.
Place the ulnar surface of the hand approximately 1 – 3 inches from the selected site; press down and pull the skin and subcutaneous tissue to the side or downward.
Maintaining tissue traction, hold the syringe like a dart and insert the needle into the skin at 90 degrees.
Maintaining tissue traction, use the available thumb and index finger to help stabilize the syringe.
Follow agency policy and manufacturer recommendations regarding aspiration. If aspiration is required, pull back the plunger and observe for blood return. If there is no blood return, inject the medication. If blood return is observed, remove the needle, and prepare a new medication.
Maintaining tissue traction, wait 10 seconds with the needle still in the skin to allow the muscle to absorb the medication. Withdraw the needle from the site and then release traction. Do not rub/massage the site.
Activate the safety feature of the needle; place in a sharps container.
17. Assess site; apply Band-Aid if necessary and appropriate.
18. Remove gloves. Perform hand hygiene.
19. Ensure safety measures before leaving the room:
Document medication administered, including the site used for the injection.


Patient reports post-surgical pain at a level of 8/10. Patient is grimacing when moving in the bed and describes pain as a dull constant ache located in the right lower abdomen surgical incision area that is aggravated by moving or repositioning. Blood pressure 146/80, heart rate 94 bpm, respirations 22 per minute, temperature (tympanic) 98.8°F, pulse oximetry 98%. Last pain medication Ketorolac 30 mg (IM) given 8 hours ago. Incision site is dry and intact. Ketorolac 30mg IM administered per health provider’s prescription in the left ventrogluteal area with 22-gauge needle, length 1 ½ inches. Patient tolerated the procedure without difficulty or increased pain. Injection site post-procedure without bleeding or hematoma.
(Answers to “Learning Activities” can be found in the “Answer Key” at the end of the book. Answers to interactive activity elements will be provided within the element as immediate feedback.)
An older, frail patient is prescribed a flu vaccine that is an aqueous or water-based solution. The patient’s deltoid muscle is not very prominent, and the patient has very little fat over the deltoid. The needles available are 23 G 5⁄8 inch, 22 G 1 inch, and 20 G 1 1⁄2 inch.
What needle size/length would work best for this particular medication and patient? Give the reason for your selection.
A patient is hospitalized on the surgical floor. Pain medication is prescribed to be given by intramuscular route. After calculating, the volume to be administered is 2 mL. The patient has a large amount of adipose tissue around her hips and buttocks region and weighs 253 pounds. The needle sizes available include 27 G 3⁄8 inch, 25 G 5⁄8 inch, 22 G 1 inch, 21 G 1 1⁄2 inch, and 20 G 2 inches.
What needle size/length and injection site would work best for this particular medication and patient? Give the reason for your selection.
The nurse is teaching a patient how to mix 5 units of regular insulin and 15 units of NPH insulin in the same syringe. The nurse determines further instruction is needed if the patient does which of the following?
Injects 5 units of air into the regular insulin vial first and withdraws 5 units of regular insulin
Injects 15 units of air into the NPH insulin vial but does not withdraw the medication
Withdraws 5 units of regular insulin before withdrawing 15 units of NPH insulin
Calculates the combined total insulin dose as 20 units after withdrawing the regular insulin from the vial
Small glass containers of liquid medication ranging from 1 mL to 10 mL sizes.
A small, raised circle that appears after administration of an intradermal medication indicating correct placement into the dermis.
Commonly used for intramuscular vaccinations in adults because it has a triangular shape and is easy to locate and access. The injection site is in the middle of the deltoid muscle, about 1 to 2 inches below the acromion process.
Refers to the diameter of a needle. Gauges can vary from very small diameter (25 to 29 gauge) to large diameter (18 to 22 gauge).
Medication administered in the dermis just below the epidermis.
Medication administered into a muscle.
Medication administered directly into the bloodstream.
Medication administered into the subcutaneous tissue just under the dermis.
A muscle located on the anterior lateral aspect of the thigh and extends from one hand’s breadth above the knee to one hand’s breadth below the greater trochanter. It is commonly used for immunizations in infants and toddlers because the muscle is thick and well-developed.
The safest intramuscular injection site for adults and children because it provides the greatest thickness of gluteal muscles, is free from penetrating nerves and blood vessels, and has a thin layer of fat.
A method for administering intramuscular injections that prevents the medication from leaking into the subcutaneous tissue, allows the medication to stay in the muscles, and minimizes irritation.
Licensed under a Creative Commons Attribution 4.0 International License. To view a copy of this license, visit https://creativecommons.org/licenses/by/4.0/.
Your browsing activity is empty.
Activity recording is turned off.
See more...