Main Exams, Offspring Cohort, Exam 5: Protocol
Norma Davis
Joanne Murabito M.D.
Sharron Rich
Michael J. Wartofsky
Table of Contents
- 1 GUIDELINES FOR ACCURACY
- 2 EQUIPMENT LIST
- 3 CALIBRATION TIME TABLE
- 4 WEIGHT MEASUREMENT
- 5 STANDING HEIGHT MEASUREMENT
- 6 SKINFOLD MEASUREMENTS
- 7 TRICEPS SKINFOLD
- 8 SUBSCAPULAR SKINFOLD
- 9 ABDOMINAL SKINFOLD
- 10 IMPORTANT POINTS FOR ACCURATE GIRTH MEASUREMENTS
- 11 RIGHT ARM GIRTH (circumference)
- 12 WAIST GIRTH (circumference)
- 13 HIP GIRTH (circumference)
- 14 PROXIMAL THIGH GIRTH (circumference)
- 15 HEEL TO KNEE MEASUREMENT
- 16 ECG PRECORDIAL LEAD PLACEMENT (see diagram, next page)
- 17 BIOELECTRICAL IMPEDANCE ASSESSMENT (BIA)
- 18 PROCEDURE TO DETERMINE MAXIMAL INFLATION LEVEL
- 19 NURSE’S SEATED BLOOD PRESSURE
- 20 ANKLE-ARM DOPPLER BLOOD PRESSURE MEASUREMENT
- 21 ORTHOSTATIC BLOOD PRESSURE AND HEART RATE MEASUREMENT
- 22 CARBON MONOXIDE ANALYSIS
- 23 COGNITIVE FUNCTION
- 24 PROCEDURE FOR CES-D INTERVIEW
- 25 STUDY OF CORTISOL AND PULMONARY FUNCTION
- Offspring 5 Clinic Phlebotomy Protocol
- Observer Check Lists
1. GUIDELINES FOR ACCURACY
To insure maximum accuracy and legibility for persons performing data entry, please adhere to the following guidelines:
- Use a red or blue pen, or any other pen which will stand out from the page (pencil or black ball-point pen unacceptable).
- Make sure all numerals are unmistakably clear.
- Do not leave any blanks on exam form. If measurements are not taken, please enter 9’s in blanks, and document the reason. Your comments are helpful at any point of the exam where data is not recorded in the standard manner.
- If you make an error, please cross it out entirely, write the correct information in the margin, and initial the change. Do not superimpose numerals one on top of the other.
- Make sure both sides of the page are filled out, as the new exam form uses two-sided pages.
- For more information on anthropometric measurements, refer to the following manual which is available in the clinic:
2. EQUIPMENT LIST
EQUIPMENT FOR BODY SIZE MEASUREMENTS
 Scale to measure body weight in lbs.: Detecto
Worcester Scale Co., Inc.
228 Brooks Street
Worcester, MA
853–2886- Weight to calibrate scale: 50 Ibs.
Worcester Scale Co., Inc. (see above)
- Vertical mounted Metal ruler (stadiometer) in cm : (homemade)
- Skinfold calipers: Lange type
Cambridge Scientific Industries
Mooselodge Road
PO Box 265
Cambridge, MD 21613
(301)-228-5111 - Step Wedge to check calibration of
skinfold calipers. Lange model #100613, $10.00.
Cambridge Scientific Industries (see above for address)
- Anthropometric Fiberglass Tape: Butterfly Brand
Made in Shanghai, China
- Ross Knee Height Caliper: Model #50452
Ross Laboratories
Columbus, OH 43216
EQUIPMENT FOR EXAM PROCEDURES
- Carbon Monoxide Analyzer: Ecolyzer, Series 2000
Repairs: ETA Associates, Inc.
PO Box 13
Nonantum, MA 02195
(617)-527-4544
(617)-527-1611
(617)-244-6683 -
- CO Removable Calibration Canister; Calgaz, Model #7156LPM
- gauge
- ETA Associates, Inc. (see above)
- Spirometer: Collins Eagle H, Model #006038
Warren E. Collins, Inc.
220 Wood Road
Braintree, MA 02184
(617)-843-0610
(800)-225-5157 - 3 liter calibration syringe Model #021156
- 1 liter precision syringe: Vitalograph, Catalogue# 20-408
Made in England
NOTE: Items 3, 4, and 5 are used for the Pulmonary Function Test. Please see operations manual.
- **For Pulmonary Function Test (PFT), please see: Manual of
Operations: Pulmonary Function Assessment
Paul Enright, MD
Peter Boyle & Pam Boyer-Pfersdorf
University of Arizona
Respiratory Sciences Room 2342
1501 N. Campbell Ave.
Tucson, AZ 85724
(602) 626-6415, fax (602) 626-6970 - Microcomputer Augmented Cardiograph (MAC) PC [cardiogram computer]: Model
#G6L10355
Marquette Electronics
PO Box 9100
100 Marquette Drive
Jupiter, FL 33468-9100
(800)-552-3249
(800)-558-7072 (technical support) - Power module for MAC PC: Model #F6L70157
Marquette Electronics (see above)
- Microcomputer Augmented Cardiograph (MAC) II: Series 6725/6750 (1984
model)
Marquette Electronics (see above)
- Body Composition Analyzer: Model #BIA-101
RJL Systems
9930 Whittier
Detroit, MI 48224
(800)-528-4513
(313)-790-0200See body composition data set
- 8 megahertz doppler pen probe
Parks Medical Electronics, Inc.
19460 S.W. Shaw
Aloha, Oregon 97007 - Ultrasonic Doppler Flow Detector: Model [ ]-B
(with power cord 91-2305)Parks Medical Electronics, Inc.
19460 S.W. Shaw
Aloha, Oregon 97007 - Standard mercury column sphygmomanometer: Wall-mounted Baumanometer
(E98169)
W.A. Baum Co., Inc
620 Oak Street
Copiague, NY 11726
(516)-226-3940 - Portable standard mercury column sphygmomanometer:
Baumanometer, 300 model; Catalogue #0661-0320W.A. Baum Co., Inc.
620 Oak Street
Copiague, NY 11726
(516)-226-3940
3. CALIBRATION TIME TABLE
4. WEIGHT MEASUREMENT
- Ask participant to wear FHS gown for measurement if he/she brought heavy gown from home. Have participant remove slippers or shoes.
- Prior to asking participant to step onto scale, lift the counter poise and position it at zero.
- Ask participant to step onto scale, facing measurement beam.
- Instruct participant to stand in the middle of the scale platform with head erect and eyes looking straight ahead. Weight should be equally distributed on both feet, and participant should not touch or support him/herself.
- With participant standing still in the proper position, lift the counterweight (larger weight), and slide it to the right until the beam approaches balance.
- Adjust the top poise until the beam is evenly balanced.
- Have participant step off scale. Read weight with eyes level to the point of measurement.
- Record the weight to the nearest pound; round up if ≥ 0.5, round down if < 0.5.
- Calibrate scale daily.
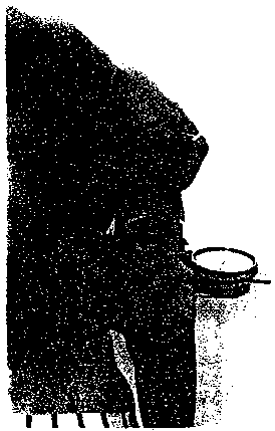
5. STANDING HEIGHT MEASUREMENT
- Participant should be barefoot or wearing thin socks so positioning of the body can be seen. Ask participant to stand erect with his/her back to vertical mounted metal ruler (stadiometer).
- Heels should be together and against the vertical ruler, both feet flat on the floor, with weight distributed evenly across both feet. Check to make sure both feet are back against the wall.
- Participant faces straight ahead with his/her head positioned in the Frankfort horizontal plane (see next page). The lower margin of the bony orbit (the socket containing the eye) should be on the same horizontal plane as the most forward point in the supratragal notch (the notch just above the anterior cartilaginous projections of the external ear.)
- Ask participant to let arms hang freely by the sides of the trunk, palms facing the thighs. Ask participant to inhale deeply and maintain a fully erect position.
- Bring the carpenter square down snugly but not tightly on top of participant’s head. Use an extension board for proper measurement of severely kyphotic subjects.
- Record measurement to the nearest 1/4 inch, rounding down.

Reference Data
Reference DataAbraham, S.;Johnson, CL.; Najjar, MF. Weight by height and age for adults 18–74 years. U.S. 1971–1974, vital and health statistics. Washington, DC: U.S. Government Printing Office; 1979. Series 11, No. 211, Department of Health, Education, and Welfare.
National Aeronautics and Space Administration. Anthropometric source book vol. I: Anthropometry for designers: Vol. II: A handbook of anthropometric data. Houston, TX: Lyndon B. Johnson Space Center; 1978. No. 1024.
6. SKINFOLD MEASUREMENTS
DEFINITION
SKINFOLD = FATFOLD
Skinfolds actually are the thicknesses of double folds of skin and fat tissue under the skin at specific body sites (triceps, subscapular, abdomen).
PURPOSE
Skinfolds are a simple measure of general fatness and a simple way to assess the distribution of fat tissue. They are used to investigate the health risks associated with obesity.
IMPORTANT POINTS
- STANDARDIZATION OF SITE SELECTION AND LOCATION
Small differences in location can make significant differences in measurement. Carefully mark the site to be measured.
- “AMOUNT TO PINCH”
The amount of tissue elevated must be sufficient to form a fold with approximately parallel sides. Care must be used so that only skin and fat are elevated.
- PLACEMENT OF CALIPER JAWS
Jaws should be placed midway between the general surface of the body and the crest of the skinfold.
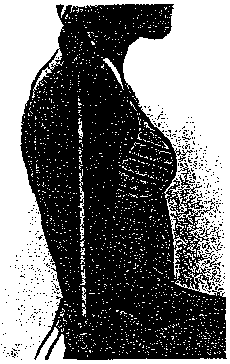
7. TRICEPS SKINFOLD
- Locate and mark posterior tip of the acromial process (point of the shoulder) on the right arm.
- Have participant flex right elbow 90 degrees.
- Mark olecranon (point of the elbow) and then straighten and relax arm.
- Measure with cloth tape the distance between the acromial process and the olecranon (see figure 1, next page).
- Make a pen mark on the back of the right upper arm halfway between the tip of the acromial process and the olecranon.
- Have the participant place right arm at his/her side.
- Check caliper on measuring block at 10 mm.
- Firmly grasp a fold of skin between thumb and first two forefingers in your left hand, 1 cm above the mark of the midpoint of the upper arm. Gently lift fold away from the muscle and then release fold.
- Repeat, gently lifting fold 2 or 3 times to make sure no muscle is grasped.
- Again, firmly grasp a fold of skin, gently lifting fold away from the muscle.
- Place the contact surface of the caliper at the level of the mark (see figure 2, next page).
- Keep a firm grip on the skinfold with the left hand during the entire measurement.
- Release the calipers, count silently 1-2-3 (approximately 2 seconds) and take the reading.
- Take the reading to the millimeter, rounding down, before the needle drifts. Hold the pinch until after the measurement is completed.
Adapted from Atherosclerosis Risk in Communities Study (ARIC) Protocol Manual 2. Cohort Component Procedures. Version 2.0 1/88, pp. A46–A47.

Reference Data
Reference DataFrisancho AR. New norms of upper limb fat and muscle areas for assessment of nutritional status. American Journal of Clinical Nutrition. 1981;34:2540–2545.
Johnston, CL.;Fulwood, R.;Abraham, S.; Bryner, JD. Basic Data on anthropometric and angular measurements of the hip and knee joints for selected age groups 1–74 years of age. United States. 1971–1975. Washington. D.C.: U.S. Government Printing Office; 1981. (Vital and Health Statistics, Series 11, No. 219. U.S. Department of Health and Human Services).
8. SUBSCAPULAR SKINFOLD
- Have the participant place right hand in middle of his/her back to help define the medial border of the right scapula.
- Locate the medial border of the right scapula with the fingers of your left hand.
- Move your fingers down the full length of the medial border of the scapula until the inferior angle is located.
- Have subject relax arm at his/her side.
- Make a pen mark 1 cm below the inferior angle of the right scapula on the diagonal line extending slightly downward and outward from the medial border (see figure 1, next page).
- Grasp the skinfold 1 cm above the mark with your left hand. The skinfold is grasped and lifted up along the diagonal line extending slightly downward from the medial border. Gently lift fold away from the muscle and then release fold.
- Repeat, gently lifting fold 2 or 3 times to make sure no muscle is grasped.
- Again, firmly grasp a fold of skin, gently lifting fold away from the muscle.
- Place the contact surface of caliper at the level of the mark (see figure 2, next page).
- Keep a firm grip on the skinfold with left hand during entire measurement.
- Release caliper, count silently 1-2-3 (approximately 2 seconds) and take the reading.
- Take the reading to the millimeter, rounding down, before the needle drifts. Hold the pinch until after the measurement is completed.
Adapted from Atherosclerosis Risk in Communities Study (ARIC) Protocol Manual 2. Cohort Component Procedures. Version 2.0 1/88, p. A48–A49.

Reference Data
Reference DataDurnin JVGA, Womersley J. Body fat assessed from total body density and its estimation from skinfold thickness. British Journal of Nutrition. 1974;32:77–97.
Stoudt, H.;Damon, A.; McFarland, R. Skinfolds, body girths, biacromial diameter and selected anthropometric indices of adults. United States. 1960–1962. Washington, D.C.: U.S. Government Printing Office; 1970. Vital and Health Statistics. Series 11, No. 35. U.S. Department of Health. Education and Welfare).
9. ABDOMINAL SKINFOLD
- With cloth tape, measure 3 centimeters to the right of umbilicus (navel) and 1 cm inferior to it (see figure 1, next page). Mark the spot. If a scar is present, measure 3 cm to the left of umbilicus and 1 cm inferior to it. If the left side is used, please note on the exam form.
- At the marked spot, firmly grasp a fold of skin between thumb and first two forefingers in your left hand. Gently lift fold away from the muscle and then release fold. Raise a horizontal skinfold.
- Repeat, gently lifting fold 2 or 3 times to make sure no muscle is grasped.
- Place the contact surface of the caliper at the level of the mark (see figure 2, next page).
- Keep a firm grip on the skinfold with the left hand during the entire measurement.
- Release the calipers, count silently 1-2-3 (approximately 2 seconds) and take the reading.
- Take the reading to the millimeter, rounding down before the needle drifts. Hold the pinch until after the measurement is completed.

10. IMPORTANT POINTS FOR ACCURATE GIRTH MEASUREMENTS
(right arm, waist, hip and proximal thigh girths)
- Carefully locate the correct site to be measured.
- Keep the measuring tape snug so it does not slide, but do not indent the skin.
- Make sure tape is horizontal for the entire circumference of the body part.
11. RIGHT ARM GIRTH (circumference)
- Locate and mark posterior tip of the acromial process on the right arm (see figure 1, next page).
- Have participant flex right elbow 90 degrees.
- Mark olecranon (point of the elbow) and then straighten and relax arm.
- Measure with cloth tape the distance between the acromial process and the olecranon.
- Make a pen mark on the back of the right upper arm halfway between the tip of the acromial process and the olecranon.
- Have the subject place right arm at his/her side.
- Measure arm circumference at midpoint of upper arm (see figure 2, next page). Record measurement to the nearest 1/4 inch, rounding down.

Reference Data
Reference DataBishop CW, Bowen PE, Ritchey SS. Norms for nutritional assessment of American adults by upper arm anthropometry. American Journal of Clinical Nutrition. 1981;34:2830–2839.
Frisancho A. Triceps skinfold and upper arm muscle size norms for assessment of nutritional status. American Journal of Clinical Nutrition. 1974;27:1052–1057.
Frisancho AR. New norms of upper limb fat and muscle areas for assessment of nutritional status. American Journal of Clinical Nutrition. 1981;34:2540–2545.
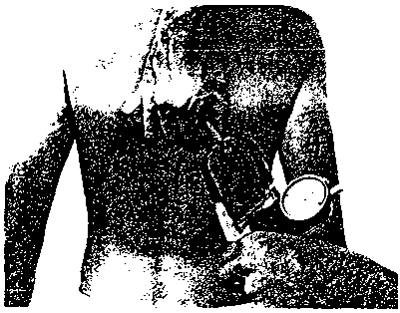
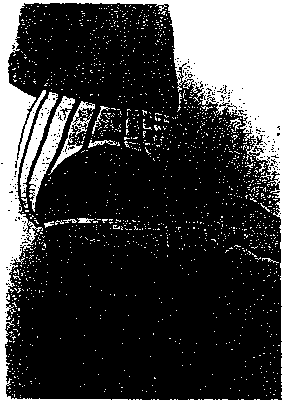
12. WAIST GIRTH (circumference)
- Participant stands erect, arms hanging loosely at sides, weight equally distributed on both feet, head facing straight ahead.
- Apply anthropometric tape at the level of the umbilicus, underneath the gown (see figure on following page).
- Apply tape snugly but not tightly.
- Make sure the tape is horizontal and not twisted, checking from both the front and back.
- Read measurement at mid-respiration with participant breathing normally.
- Record measurement to the nearest 1/4 inch, rounding down.
Adapted from Atherosclerosis Risk in Communities Study (ARIC) Protocol Manual 2. Cohort Component Procedures. Version 2.0 1/88, p. A50.

Reference Data
Reference DataNational Aeronautics and Space Administration. Anthropometric source book vol. I: Anthropometry for designers: Vol. II: A handbook of anthropometric data. Houston, TX: Lyndon B. Johnson Space Center; 1978. No. 1024.
Stoudt, H.;Damon, A.; McFarland, R. Skinfolds, body girths, biacromial diameter and selected anthropometric indices of adults. United States. 1960–1962. Washington, D.C.: U.S. Government Printing Office; 1970. (Vital and Health Statistics, Series 11, No. 35. U.S. Department of Health, Education and Welfare).
13. HIP GIRTH (circumference)
- Participant stands erect, arms hanging loosely at sides, weight equally distributed on both feet, head facing straight ahead.
- Apply anthropometric tape at the level of the maximal protrusion of the gluteal muscles, underneath the gown but over the underwear (see figure on following page).
- Apply tape snugly but not tightly.
- Make sure the tape is horizontal and not twisted, checking from both the front and back.
- Record measurement to the nearest 1/4 inch, rounding down.
Adapted from Atherosclerosis Risk in Communities Study (ARIC) Protocol Manual 2. Cohort Component Procedures. Version 2.0 1/88, p. A51.

Reference Data
Reference DataClauser, CE.;Tucker, PE.;McConville, JT.;Churchill, E.;Laubach, LL.; Reardon, JA. Anthopometry of Air Force women. Dayton, OH: Aerospace Medical Research Laboratory, Aerospace Medical Division, Air Force Systems Command, Wright-Patterson Air Force Base; 1972. (Report No. AMRL-TR-70-5).
National Aeronautics and Space Administration. Anthropometric source book vol. I: Anthropometry for designers: Vol. II: A handbook of anthropometric data. Houston, TX: Lyndon B. Johnson Space Center; 1978. No. 1024.
White, R.; Churchill, E. The body size of soldiers. Natick, MA: U.S. Army Natick Laboratories; 1971. TR72-51-CE.
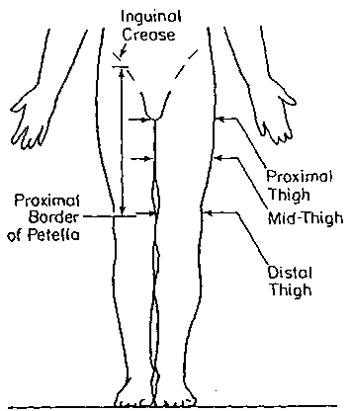
14. PROXIMAL THIGH GIRTH (circumference)
- Participant stands erect, arms hanging loosely at sides, weight equally distributed on both feet, head facing straight ahead. Legs should be far enough apart that thighs do not touch each other.
- Apply anthropometric tape immediately below the gluteal furrow (buttock) (see figures, next page).
- Apply tape snugly but not tightly.
- Make sure the tape is horizontal and not twisted, checking from both the front and back.
- Record measurement to the nearest 1/4 inch, rounding down.

Reference Data
Reference DataClauser, CE.;Tucker, PE.;McConville, JT.;Churchill, E.;Laubach, LL.; Reardon, JA. Anthopometry of Air Force women. Dayton, OH: Aerospace Medical Research Laboratory, Aerospace Medical Division, Air Force Systems Command, Wright-Patterson Air Force Base; 1972. (Report No. AMRL-TR-70-5).
Hertzberg, HTE.;Churchill, E.;Dupertuis, CW.;White, RM.; Damon, A. Anthropometric survey of Turkey, Greece, and Italy. New York: Macmillan Company; 1963.
MacDougall, JD.;Wenger, HA.; Green, HJ. Physiological testing of the elite athlete. Ottawa, Canada: Canadian Association of Sport Sciences; 1981.
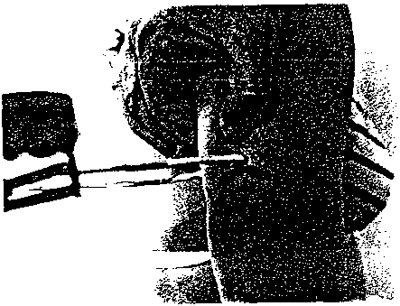
15. HEEL TO KNEE MEASUREMENT
PURPOSE
As people age, they will often shrink in height. Generally, this shrinkage is due to the spaces between the bones in the spine shrinking. The lower leg consists of two bones which go from the heel to the knee - this does not change over time. By measuring this heel to knee distance and using a factor based on age, we are better able to compare people of different ages and different amounts of spinal shrinkage.
METHOD
- With subject seated, bend both left knee and left ankle to a 90 degree angle (figure 1 on following page). Check the angles by using the triangle (figure 2).
- Open the caliper and place the fixed blade under the heel. The inside of the ankle and lower leg should be against the vertical bar of the caliper. Press the sliding blade down against the thigh about 2 inches behind the kneecap (patella) (figure 3). The shaft of the caliper should be in line with the large bone in the lower leg (tibia) and be over the ankle-bone (lateral malleolus) (figure 4).
- To hold the measurement, push the locking lever away from the blades (figure 5). Read the measurement through the viewing window to the nearest 0.1 centimeter (figure 6).
- Release the locking lever by pushing it toward the caliper blades.


16. ECG PRECORDIAL LEAD PLACEMENT (see diagram, next page)
- Point V1: The first intercostal space is palpated just below the clavicle. Count down and identify the fourth intercostal space just below the fourth rib. Point V1 is just to the right of the sternum in the fourth intercostal space.
- Point V2: Should be at the same level as Point V1 and immediately to the left of the sternum.
- Point V4: Lies in the midclavicular line in the fifth interspace. (In a male or a small breasted female, this is usually close to the nipple.)
- Point V3: Lies at the midpoint of an imaginary straight line connecting V2 and V4. Use a flexible, graduated straight edge to mark the point midway between V2 and V4.
- Point V6: Lies in the middle axillary line in the fifth intercostal space.
- Point V5: Lies in the anterior axillary line in the fifth
intercostal space, midway between V4 and V6.
NOTE: Place electrodes on chest wall, not on top of breast.

17. BIOELECTRICAL IMPEDANCE ASSESSMENT (BIA)
See Body Composition data set
PURPOSE
(For the participant) Bioelectrical impedance assessment (BIA) is a method for determining the amount of lean and fat tissue there is in the body. These measurements will be used to investigate health risks associated with obesity.
(For the medical technician) Electrodes placed on the body are attached to the BIA machine. A very slight charge is run through the body (one cannot feel this). Fat and lean tissue conduct the charge differently and give us resistance and reactance values which are then used to calculate the percentages of lean and fat in the body.
- For best results:
- Use electrodes only once.
- Legs should be far enough apart that thighs do not touch each other. If participant is obese, it may be necessary to use a towel to separate thighs.
- Hands and arms should be far enough apart that they do not touch the torso.
- No body part should be in contact with any external metal (although jewelry and pins in bones will not affect the results).
- The subject’s skin should be clean, dry and warm (not hot or
cold) to the touch.
- If skin is oily, clean with an alcohol swab before attaching the electrodes.
- If skin is extremely dry, apply a small amount of ECG or conductive paste before attaching the electrodes.
- Prior to attachment, cut the electrodes in half, bisecting the foil tab.
- Electrode placement:
- Bioelectrical Impedance Assessment (BIA) measurements will be
made with the electrode halves in two sets of sites (four sites
altogether), in order to allow estimation of total body and
trunk body composition. These two sites are:
- Wrist/metacarpal prominence (MCP) and ankle/metatarsal prominence (MTP)
- Iliac crest/thigh and sternal notch/mid neck, respectively, according to the method of Baumgartner et. al. (see diagram on page 29).
- Each pair of electrode halves should face each other on the cut side and be parallel. The tab side of the electrode should face toward the BIA machine.
- Three measures are made at each site, without moving the electrodes between measurements.
- Bioelectrical Impedance Assessment (BIA) measurements will be
made with the electrode halves in two sets of sites (four sites
altogether), in order to allow estimation of total body and
trunk body composition. These two sites are:
- To read the Impedance Data:
- Turn on power switch.
- Place the x1/x10 switch in the x1 position.
- Place the Resistance/Reactance switch in the Resistance position. Record the Resistance value which appears on the Impedance meter.
- Place the Resistance/Reactance switch in the Reactance position. Record the Reactance value which appears on the Impedance meter.
- Immediately after taking the Resistance and Reactance values, turn off the power switch to conserve the system’s batteries.

18. PROCEDURE TO DETERMINE MAXIMAL INFLATION LEVEL
For each participant, determine the maximal inflation level, or the pressure to which the cuff is to be inflated for systolic blood pressure measurement. This assures that the cuff pressure at the start of the reading exceeds the systolic blood pressure and thus allows the first Korotkoff sound to be heard.
- Attach the cuff tubing to the sphygmomanometer.
- Palpate the radial pulse.
- Inflate the cuff rapidly until the radial pulse is no longer felt (palpated systolic) by inflating rapidly to 70 mmHg, then inflating by 10 mmHg increments.
- Deflate the cuff quickly and completely.
19. NURSE’S SEATED BLOOD PRESSURE
- Equipment:
- One standard Litman stethoscope tubing and earpieces with bell: Classic II 3M
- One standard mercury column sphygmomanometer: Baumanometer
- BP cuffs in three sizes:
- 1 large adult cuff
- 1 pediatric cuff
- 1 regular adult cuff
- Application of the blood pressure cuff:
- With participant seated, place the appropriate cuff around the upper left arm. The midpoint of the length of the bladder should lie over the brachial artery, and the mid-height of the cuff should be at heart level.
- Place the lower edge of the cuff, with its tubing connections, about 1 inch above the natural crease across the inner aspect of the elbow.
- Wrap the cuff snugly about the arm, with the palm of the participant’s hand turned upward.
- If the subject has had a left-sided mastectomy, the right arm may be used for blood pressure measurement.
- Guidelines for accurate blood pressure readings:
- The participant should be in a seated position for at least 5 minutes before the blood pressure is measured.
- All readings are made to the nearest even digit.
- Any reading which appears to fall exactly between marking on the mercury column should be read to the next higher marking, i.e. 2, 4, 6, 8, or 0.
- All readings are made at the top of the meniscus, the rounded surface of the mercury column.
- When the pressure is released quickly from a high level, a vacuum is formed above the mercury and the meniscus is distorted. Allow a few moments for it to reappear before reading the manometer.
- Blood pressure readings:
- Following any previous inflation, wait at least 30 seconds after the cuff has completely deflated.
- By closing the thumb valve and squeezing the bulb, inflate the cuff at a rapid but smooth, continuous rate to the maximal inflation level (30mmHg above palpated systolic pressure).
- The examiner’s eyes should be level with the mid-range of the manometer scale and focused at the level to which the pressure will be raised.
- Open the thumb valve slightly. Allow the cuff to deflate, maintaining a constant rate of deflation at approximately 2 mmHg per second.
- Using the bell of the stethoscope, listen throughout the entire range of deflation, from the maximum pressure past the systolic reading (the pressure where the first regular sound is heard), until 10 mmHg below the level of the diastolic reading (that is, 10 mmHg below the level at which the last regular sound is heard.)
- Deflate the cuff fully by opening the thumb valve.
- Remove stethoscope. Neatly enter systolic and diastolic readings in the spaces provided on the form.
20. ANKLE-ARM DOPPLER BLOOD PRESSURE MEASUREMENT
Please refer to the Ankle-Arm Blood Pressure data set for most current data.
PURPOSE
The ratio of the ankle blood pressure to the arm blood pressure provides a measure of lower extremity arterial disease (circulation problems).
- Equipment:
- 8 megahertz doppler pen probe
- Ultrasonic Doppler Flow Detector
- Doppler conducting jelly
- Standard mercury column sphygmomanometer: Wall-mounted Baumanometer
- Calibrated V-Lok BP cuffs in three sizes:
- 2 large adult cuff
- 2 pediatric cuffs
- 4 regular adult cuffs
- Black ball point pen and black eyeliner pencil
- Tissues to remove conducting jelly
- Exclusions:
- Persons with venous stasis ulceration or other pathology that precludes placing a BP cuff around the ankle (e.g. open wounds.)
- Persons with rigid arteries such that an occlusion pressure cannot be reached.
- Persons with bilateral amputations of legs.
- Subjects who fit any of the above categories are recorded as missing data.
- If a subject has undergone a mastectomy, blood pressure measurement will be excluded in that extremity only, and recorded as missing data.
- Set-up Procedure:
- Ask participant to remove shoes and stockings so that the ankles are bare to mid-calf.
- Lay participant supine on the examining table.
- Keep participant supine for at least five minutes before measuring BP.
- Place four BP cuffs on the participant (be sure to check for
appropriate cuff size):
- Right arm
- Left arm
- Right ankle
- Left ankle
- Apply ankle cuffs with midpoint of bladder over posterior tibial artery, with lower end of bladder approximately 3 cm above medial malleolus.
- General Guide to Blood Pressure Readings:
- Following any previous inflation, wait at least 30 seconds after cuff has completely deflated.
- By closing the thumb valve and squeezing the bulb, inflate the cuff at a rapid but smooth, continuous rate to the maximal inflation level (30 mmHg above systolic pressure).
- The examiner’s eyes should be level with the mid-range of the manometer scale and focused at the level to which the pressure will be raised.
- By opening the thumb valve slightly, and maintaining a constant rate of deflation at approximately 2 mmHg per second, allow the cuff to deflate.
- Listen throughout the entire range of deflation, past the systolic reading (the pressure where the first regular sound is heard), for 10 mmHg. Three subsequent beats should be heard for any valid systolic blood pressure reading.
- Deflate the cuff fully by opening the thumb valve.
- Neatly enter systolic readings in the spaces provided on the form.
- Right and Left arm systolic blood pressure
measurement:
- Attach right arm cuff tubing to manometer.
- Locate brachial artery by palpation. Mark site with eyeliner pencil.
- Apply ultrasound jelly over brachial artery.
- Locate brachial artery using doppler pen probe.
- Hold the doppler probeabsolutelystill. It can easily slip off the artery.
- Measure the systolic blood pressure:
- Inflate cuff quickly to maximal inflation level (30 mmHg above systolic pressure)
- Deflate at 2 mmHg/second, to appearance of systolic pressure
- Follow down for 10 mmHg. Three subsequent beats should be heard for any valid systolic blood pressure reading.
- Deflate cuff quickly and completely.
- Remove doppler pen probe.
- Neatly record systolic blood pressure.
- Follow same procedure for left arm.
- Right and left ankle systolic blood pressure
measurement:
- Connect right ankle cuff to the manometer.
- Locate posterior tibial artery by palpation. Mark site with eyeliner pencil.
- Apply ultrasound jelly over posterior tibial artery.
- Locate posterior tibial artery using doppler pen probe.
- Hold the doppler probeabsolutelystill. It can easily slip off the artery.
- Measure the systolic blood pressure:
- Inflate cuff quickly to maximal inflation level (30 mmHg above systolic pressure).
- Deflate at 2 mmHg/second to appearance of systolic pressure.
- Follow down for 10 mmHg. Three subsequent beats should be heard for any valid systolic blood pressure reading.
- Deflate cuff quickly and completely.
- Remove doppler pen probe.
- Neatly record ankle systolic blood pressure.
- Disconnect right ankle cuff from manometer. Connect left ankle cuff to manometer and repeat procedure.
NOTE: If the posterior tibial pulse cannot be found with palpation or doppler pen probe, use the dorsalis pedis artery for the measurement. Have another examiner verify the absent posterior tibial pulse.
- Repeat of ankle and arm blood pressure
measurements:
- Repeat the sequence of measures in reverse order:
- left ankle
- right ankle
- left arm
- right arm
NOTE: If initial and repeat blood pressures measured at any one site (R arm, L arm, R ankle or L ankle) differ by more than 20 mmHg, please take a third measurement at that site.
- Repeat the sequence of measures in reverse order:
- Completion:
- Review form for completeness and legibility.
- Remove cuffs and conducting jelly.
Adapted from CHS Operations Manual, 4.11. OP, February 15, 1989, pp. 1–5.
Reference Data
Reference DataSchroll M, Munck O. Estimation of Peripheral Arteriosclerotic Disease by Ankle Blood Pressure Measurements in a Population Study of 60-Year Old Men and Women. J Chron Dis. 1981;34:261–269.[PubMed ID: 7240365]
Criqui MH, Coughlin SS, Fronek A. Noninvasively diagnosed peripheral arterial disease as a predictor of mortality; results from a prospective study. Circulation. 1985;72:768–773.[PubMed ID: 4028377]
Safer ME, Totomoukouo JJ, Asmar RA, et al. Increased Pulse Pressure in Patients with Arteriosclerosis Obliterans of the Lower Limbs. Arteriosclerosis. 1987;7:232–237.[PubMed ID: 3593069]
Marinelli MR, Beach KW, Glass MJ, et al. Noninvasive Testing vs. Clinical Evaluation of Arterial Disease. JAMA. 1979;241:2031–2034.[PubMed ID: 430797]
Prineas RJ, Harland WR, Janzon L, et al. Recommendations for Use of Non-Invasive Methods to Detect Atherosclerotic Peripheral Arterial Disease - In Population Studies. Circulation. 1982;65:1561A–1566A.[PubMed ID: 6210463]
Janzon L, Bergentz SE, Ericsson BF, et al. The Arm-Ankle Pressure Gradient in Relation to Cardiovascular Risk Factors in Intermittent Claudication. Circulation. 1981;63:1339–1341.[PubMed ID: 7226479]
Eickhoff JH, Engell HC. Diagnostic correctness of distal blood pressure measurements in patients with arterial insufficiency. Scand J Clin Lab Invest. 1980;40:647–652.[PubMed ID: 7466293]
Yao ST, Hobbs JT, Irvine WT. Ankle Systolic Pressure Measurements in Arterial Disease Affecting the Lower Extremities. Brit J Surg. 1969;56:676–766.[PubMed ID: 5808379]
21. ORTHOSTATIC BLOOD PRESSURE AND HEART RATE MEASUREMENT
Test not done at this exam.
- Background and purpose:
Previous work has shown that orthostasis appears to be an independent risk factor for subsequent mortality in older adults. Work by Sparrow and colleagues has suggested that postural changes in blood pressure predict the incidence of sustained blood pressure elevation as well as myocardial infarction events. Postural changes in heart rate and blood pressure have also been proposed as markers of cardiovascular reactivity, an area of current interest in the study of determinants of blood pressure elevation and cardiovascular morbidity, about which very little is known in older adults.
- Equipment:
- One standard Litman stethoscope tubing and earpieces with bell: Classic II 3M
- One standard mercury column sphygmomanometer: Baumanometer
- Large wall clock with second hand
- BP cuffs in three sizes:
- 1 large adult cuff
- 1 pediatric cuff
- 1 regular adult cuff
- Application of the blood pressure cuff:
- With participant on the examination table, place the appropriate cuff around the upper left arm. The midpoint of the length of the bladder should lie over the brachial artery, and the mid-height of the cuff should be at heart level.
- Place the lower edge of the cuff, with its tubing connections, about 1 inch above the natural crease across the inner aspect of the elbow.
- Wrap the cuff snugly about the arm, with the palm of the participant’s hand turned upward.
- If the subject has had a left-sided mastectomy, the right arm may be used for blood pressure measurement.
- Guidelines for accurate blood pressure readings:
- All readings are made to the nearest even digit.
- Any reading which appears to fall exactly between markings on the mercury column should be read to the next higher marking, i.e. 2, 4, 6, 8, or 0.
- All readings are made at the top of the meniscus, the rounded surface of the mercury column.
- When the pressure is released quickly from a high level, a vacuum is formed above the mercury and the meniscus is distorted. Allow a few moments for it to reappear before reading the manometer.
- Heart rate measurement:
- Palpate the radial pulse with the palm of the hand turned upward for exactly 30 seconds.
- Record the number of beats per 30 seconds.
- Blood pressure readings:
- Following any previous inflation, wait at least 30 seconds after the cuff has completely deflated.
- By closing the thumb valve and squeezing the bulb, inflate the cuff at a rapid but smooth, continuous rate to the maximal inflation level (30 mmHg above palpated systolic pressure).
- The examiner’s eyes should be level with the mid-range of the manometer scale and focused at the level to which the pressure will be raised.
- Open the thumb valve slightly. Allow the cuff to deflate, maintaining a constant rate of deflation at approximately 2 mmHg per second.
- Listen throughout the entire range of deflation, from the maximum pressure past the systolic reading (the pressure where the first regular sound is heard), until 10 mmHg below the level of the diastolic reading (that is, 10 mmHg below the level at which the last regular sound is heard.)
- Deflate the cuff fully by opening the thumb valve.
- Remove stethoscope. Neatly enter systolic and diastolic readings in the spaces provided on the form.
- Supine heart rate and blood pressure measurement
procedures:
- Place the participant in the full supine position for 5 minutes.
- Measure the heart rate. Neatly record it on the study form.
- Obtain blood pressure measurement. Neatly record it on form.
- Measure second heart rate 1 minute 30 seconds after obtaining first blood pressure measurement.
- Measure second supine blood pressure measurement 2 minute after the first BP measurement.
- Standing heart rate and blood pressure measurement:
- Assist participant to standing position. If participant cannot stand without support, assist him/her to an upright seated position.
- Arrange cuff tubing to prevent it from pulling.
- Ask participant not to talk other than to express any discomfort.
- Hold the participant’s left arm so that it rests slightly below the heart level. Support it by holding it against your side and with the hand holding the stethoscope in place.
- To prevent the blood pressure cuff from sliding, participant’s arms are kept flexed at the elbow and relaxed, with hands clasped loosely and resting against the abdomen.
- Measure heart rate after participant has been standing for 30 seconds.
- Measure the 1 minute standing blood pressure.
- Measure second heart rate after 1 minute 30 seconds have elapsed since standing.
- Take second blood pressure measurement after 2 minutes have elapsed since standing.
- Participant safety measures for orthostatic bp
measurement:
- Prior to assisting participant to standing position, notify participant that if s/he feels dizzy to lean backwards against the examination table and ask for assistance. This is the time of highest risk of orthostatic symptoms.
- To enhance participant safety, stay close by and observe participant’s alertness, to verify visually that s/he tolerates upright position well.
- When there appear to be any symptoms of dizziness or fainting, or when in the judgement of the examiner, the participant is unstable, seat the participant and obtain remaining measurements in the sitting position.
- If the participant continues to feel dizzy or is fainting, support participant under his/her arms and place him/her on the table.
- Notify clinic physician that assistance is required and immediately return to the participant.
- Elevate and support participant’s feet in a 20 degree angle from the floor.
- Obtain heart rate and blood pressure measurements.
- After the clinic physician has attended to the participant’s safety and comfort, log the incident on the study form. This will provide a record of the occurrence, and indicate the participant’s position (standing/sitting) when the measurements were obtained.
Adapted from CHS Operations Manual, 4.9. OP. October 7, 1989 pp. 103–109.
Reference Data
Reference DataMader SL, Palmer RM, Rubenstein LZ. Effect of Timing and Number of Baseline Blood Pressure Determinations on Postural Blood Pressure Response. J Am Geriatr. 1989;37:444–446.
Thomas JE, Schirger A, Fealey RD, Sheps SG. Orthostatic Hypotension. Mayo Clin Proc. 1981;56:117–125.
Walczak M. Prevalence of Orthostatic Hypotension in High-Risk Ambulatory Elders. J of Geront Nursing. 1991;17:26–29.
Caird FI, Andrews GR, Kennedy RD. Effect of Posture on Blood Pressure in the Elderly. Br H + J. 1973;35:527–530.
Sparrow D, Tifft CP, Rosner B, Wuss ST. Postural Changes in Diastolic Blood Pressure and the Risk of Myocardial Infarction: The Normative Aging Study. Arc. 1984;70:533–537.
Davis BR, Langford HG, Blanfox MD, Curb JD, Polk BF, Shulman NB. The Association of Postural Changes in Systolic Blood Pressure and Mortality in Persons with Hypertension: The Hypertension Detection and Follow-up Program Experience. Arc. 1987;75:340–346.
Mader SL, Josephson KR, Rubenstein LZ. Low Prevalence of Postural Hypotension Among Community-Dwelling Elderly. JAMA. 1987;258:1511–1514.
Lipsitz LA. Orthostatic Hypotension in the Elderly. NEJM. 1989;321:952–957.
22. CARBON MONOXIDE ANALYSIS
- Set-up:
- Keep the Analyzer set on Low range and read the needle indicator on the Red (bottom) scale. CO content is rarely large enough to necessitate switching to the High range and scale.
- Purpose:
- CO analysis is performed to confirm or repudiate the patient’s account of his smoking/nonsmoking status as recorded during the physician’s interview.
- CO analysis is not particularly useful in assessing passive smoke exposure. Since the patient is confined to the non-smoking clinic environment for a number of hours, the excess CO s/he may have picked up has had enough time to be exchanged for O2.
- Procedure:
- Ask participant to take deep breath of room air and exhale completely.
- Ask participant to take another deep breath and to hold it for 15 seconds.
- Time the 15 seconds and offer participant encouragement to continue holding his/her breath. 15 seconds allows time for diffusion in the lungs, i.e., gas exchange of CO for O2.
- Ask participant to exhale a small amount of air, to get rid of dead-space air which does not represent blood volumes of CO.
- Ask participant to exhale remainder of his/her lung volume into the collection bag provided. Make sure the bag is pinched off before participant removes the mouthpiece from his/her mouth, or air sample will be lost.
- Remove the mouthpiece and insert the bag into the CO filter. Turn the Ecolyzer to the ON position.
- Read and neatly record the CO content in ppm’s.
- Expected levels for non-smokers is 3–7 ppm, which is picked up from environmental pollution. Expected levels for smokers are naturally higher than non-smokers, but will depend upon number of cigarettes consumed and the time elapsed between smoking and testing.
- Use caution in testing participants who have recently consumed alcohol. High blood alcohol levels can damage the Ecolyzer. The CO filter must be changed after use by a participant who has consumed alcohol. This patient is easily identified by his/her extraordinarily high CO levels, generally 40 ppm or greater.
- Quality Control:
- The Ecolyzer is calibrated daily according to the procedure outlined in the company’s manual. The manual gives no recommendations on changing the CO filter, so it is arbitrarily changed at the end of the month.
- It is also wise to perform another calibration check by testing the air sample of a non-smoking technician each week. This serves as a reference standard for the clinic’s ambient CO content.
23. COGNITIVE FUNCTION
Please refer to the MMSE data set for most current data.
I. BACKGROUND AND RATIONALE
Cognitive function may decline as a result of certain risk factors, (e.g., hypertension, elevated cholesterol, cardiac arrhythmias). This in turn could adversely impact the physical functioning and quality of life of older adults. Dementia is a major illness and cause of disability, among the elderly. Cerebrovascular disease or multi infarct dementia is the second leading cause of dementing illness among Caucasians, preceded only by Senile Dementia of the Alzheimer’s Type (SDAT).
- The Mini-Mental state is a widely used test of cognitive function among the elderly; it includes tests of orientation, registration, attention, calculation, recall, language and visuospatial skills.
II. DEFINITIONS
- ALERT LEVEL - Participant scoring 23 or less on the Mini-Mental State may have a cognitive impairment and, will be referred for further evaluation. Referral forms may be obtained from the clinic supervisor. They should be filled out and sent to the neurology department.
- MINI-MENTAL STATE EXAM SCORING The MMSE will be computer scored.
III. METHODS
- The Mini-Mental State Examination asks questions to ascertain cognitive status. Responses are scored correct or incorrect.
- If a response is ambiguous, the interviewer records the response in the margin so that a decision can be made on its appropriateness.
- When a participant is incapacitated by blindness, has a functional disability, is illiterate, or is otherwise unable to respond to all questions, the interviewer should specify the problem and question(s) involved, (see examiner’s impression)
- EXPANDED SCORING INSTRUCTIONS FOR MINI-MENTAL EXAM (based on meeting on 10/9/91)
Scoring for Administered Individual Items (applies only if a test item is administered)
0 = incorrect response; “I don’t know”; unintelligible response in context of other intelligible responses (see scoring of “9” as well)
no response, but subjects attempted to respond (i.e. they are demonstrating that they heard a question and are making an attempt to respond to it).
IMPORTANT NOTE: “0” is meant to represent whenever subjects demonstrate the inability to correctly answer a particular item. If they refuse to listen to the question, they have not demonstrated that they cannot answer the question, they have only indicated that they do not want to answer it. If subjects give no response it will not always be clear why - again, they have not demonstrated that they cannot answer the question, but have only demonstrated that they have not answered it.
1–5 = Correct response(s); note that the scoring method for “WORLD” backwards has been standardized. A copy of this scoring method is available.
IMPORTANT NOTE: Sometimes hearing impairments prevent subjects from correctly hearing test items (for example when asked to repeat three items, “apple”, “table”, and “penny”, they may repeat “April”, “tablet”, “pencil” - these alternate responses should be accepted both under the repetition and recall conditions. In the case of repeating “no ifs, and, or buts” some judgement must be made on the part of the examiner as to whether the subject could hear the “s” or not.
6 = When a test item is administered and no response is given, regardless of why (such as when a person is too severely demented, or refuses to respond to that single item (but does respond to other items on the test - right or wrong);
IMPORTANT NOTE: The single exception to scoring “6” for no response is if subject is in a coma (this circumstance would be encountered in a nursing home visit, not in a clinic visit). In this instance, administer the first item (to establish no response - give a “0” to the first item if there is no response) - (This exception is made to conform with Maggie’s current scoring procedures)
9 = When test item was not administered (if subject refuses entire test, then all items were not administered and should be scored a “9”);
IMPORTANT NOTE: Sometimes a subject might produce a response that is not a word (i.e. a neologism) but has been responding with intelligible responses on previous items (right or wrong), in this case the item should be scored “0”. The key to differentiating a “0” or “9” is consistency within test. If a person has a speech abnormality, such as aphasia or dysarthria, across all items, most (or many) responses will be unintelligible. If a person is, for example, demented, he/she may produce a flow of intelligible responses with occasional unintelligible responses. Remember, a “9” must represent situations in which the examiner is not sure whether (1) the subject responded correctly (because of slurred speech, severe stuttering, etc.), or (2) if the subject has some other factor that prevents test item administration (such as inability to administer “copy this figure” test item to a right-handed person who has right-handed paralysis or to someone with a visual impairment; or inability to hear)
Scoring Entire Test
Add up all correct responses. The total score must be less than or equal to 30 (give “6” or “9” scores a value of “0”)
EXCEPT:
If all items are scored “9”, total score is “99”.
If all items are scored “6”, total score is “66”.
If most items are scored “6”s and/or “9”s and it is unclear whether subject was able to answer questions, total score is “99”.
Examiner’s Impression
Effective January 1, 1992 (exam cycle 22 for cohort; exam cycle 5 for offspring), the examiner’s impression list will expand to include the following codes:
- 1 = normal
- 2 = possible dementia
- 4 = dementia present
- 5 = illiterate / low education
- 6 = not fluent in English
- 7 = poor eyesight; blind
- 8 = poor hearing; deaf
- 11= depression present
- 22 = aphasic (speech abnormality)
- 33 = coma
- 44 = Parkinsonian features; tremors
- 55 = other ________________________
- 99 = unknown
IV. QUESTIONS SCRIPTS AND PROCEDURES FOR EACH QUESTION
- INTRODUCTORY SCRIPT: I would like to ask you a few questions dealing with concentration and memory. Some questions may seem easy and others may be a bit more difficult.
- Read each question from the form.
- Record the response on the form.
WHAT IS THE DATE TODAY? (Month, day, year, correct score = 3)
- Ask for the date. Then ask specifically for parts omitted, e.g., “Can you also tell me what month, year it is?”
- If participant supplies part or all of the date (e.g., month and day, or month, day, and year), record as appropriate and do not ask those questions again.
WHAT IS THE SEASON?
- Since distinctions between seasons can be difficult during certain months, the following schedule has been created. For months with two seasons listed, either answer is correct for the 20th, 21st, 22nd, or 23rd day of the month. Otherwise, the first season is correct for the 1st through the 19th, and the second season is correct from the 24th to the end of the month.
| MONTH | CORRECT RESPONSE |
|---|---|
| January | Winter |
| February | Winter |
| March | Winter or Spring |
| April | Spring |
| May | Spring |
| June | Spring or Summer |
| July | Summer |
| August | Summer |
| September | Summer or Fall |
| October | Fall |
| November | Fall |
| December | Fall or Winter |
WHAT DAY OF THE WEEK IS IT?
WHAT TOWN, COUNTY AND STATE ARE WE IN?
- Ask the participant what town, county, and state we are in. Then ask specifically for parts omitted, e.g., “Can you also tell me what county this is?”
WHAT IS THE NAME OF THIS PLACE?
- Ask the participant where they are. Any appropriate answer is okay.
WHAT FLOOR OF THE BUILDING ARE WE ON?
I AM GOING TO NAME 3 OBJECTS. AFTER I HAVE SAID THEM I WANT YOU TO REPEAT THEM BACK TO ME. REMEMBER WHAT THEY ARE BECAUSE I WILL ASK YOU TO NAME THEM AGAIN IN A FEW MINUTES: APPLE, TABLE, PENNY
- Make sure participant is attentive when beginning the question.
- Read the list of objects slowly. DO NOT REPEAT ITEMS UNTIL AFTER THE FIRST TRIAL.
- If participant asks you to repeat the 3 items, RESPOND: “ Can you tell me the items I just mentioned?” or, “Just do the best you can.”
- Participant should repeat the items in the same order.
- Read: APPLE TABLE PENNY
- SCRIPT: Could you repeat the three items for me?
- Record the score for the first trial.
- If after scoring the first attempt, the participant has not learned the 3 objects, repeat the list of objects up to 6 times until the participant has learned them.
NOW I AM GOING TO SPELL A WORD FORWARD AND I WANT YOU TO SPELL IT BACKWARDS. THE WORD IS WORLD. W-O-R-L-D. PLEASE SPELL IT IN REVERSE ORDER. Write in letters,___________________ (letters are entered and scored later)
- Read the question slowly. Where “world” has hyphens between the letters, spell out the word.
- Repeat the spelling if necessary.
- Record the participants response. Write in the letters as the participant has spelled the word. The computer will score the response.
WHAT ARE THE 3 OBJECTS I ASKED YOU TO REMEMBER A FEW MOMENTS AGO?
- Items may be repeated in any order.
WHAT IS THIS CALLED? (WATCH)
WHAT IS THIS CALLED? (PENCIL)
- Show the wrist watch/pencil to the participant. NOTE: the pencil should be a standard sharpened wooden pencil with eraser.
- Code “1-correct” for each correct answer.
- Correct responses include: watch, wristwatch, timepiece.
PLEASE REPEAT THE FOLLOWING: “NO IFS, ANDS, OR BUTS.”
- Enunciate clearly; include the ’s’ at the end of “if’s, and’s, or but’s”
- Allow only one attempt.
- Code “ 1-correct” when the participant correctly repeated the phrase.
- Code “0-incorrect” when the participant did not repeat the phrase exactly.
PLEASE READ THE FOLLOWING & DO WHAT IT SAYS
- Hand participant the card.
- The participant may read the sentence out loud. The task to be coded is the participant’s ability to follow instructions by closing his/her eyes.
- Code “1-correct” when the participant closed his/her eyes.
- Code “0-incorrect” when the participant did not close his/her eyes.
PLEASE WRITE A SENTENCE
- SCRIPT: Write any complete sentence on this piece of paper for me.
- Repeat the instructions to participant if necessary.
- Score “1-correct” when the participant wrote a complete sentence as directed.
- Written commands, such as “sit down”, where the subject is implied, are considered correct responses.
- Spelling and/or punctuation errors are not counted as errors.
- Code “0-error” when the participant did not write a complete sentence as directed.
PLEASE COPY THIS DRAWING
- SCRIPT: Here is a drawing. Please copy the drawing on the same piece of
paper.
- To be correct, each pentagon must have:
- 5 sides, and
- 5 sides that point outward.
- The overlap figure must have 4 sides.
- To be correct, each pentagon must have:
- Code “0-error” when the participant’s figure did not match.
TAKE THIS PIECE OF PAPER IN YOUR RIGHT HAND, FOLD IT IN HALF WITH BOTH HANDS, AND PUT IT IN YOUR LAP
(score 1 for each correctly performed act, code 6 if low vision)
- INTRODUCTORY SCRIPT: I am going to give you a piece of paper. When I do, take the paper in your right hand, fold the paper in half with both hands, and put the paper down on your lap.
- Read the full statement before handing the paper to the participant.
- Do not direct the paper to participant’s right side. Hold the paper in front and have the participant reach out to take it. Observe which hand is used.
- Do not repeat instructions or coach participant.
24. PROCEDURE FOR CES-D INTERVIEW
Interview not done at this exam.
This interview below is given by the clinic personnel. The interviewer records the patient’s response on the form.
- RATIONALE AND BACKGROUND
The Center for Epidemiologic Studies Depression Scale (CES-D) was developed for use in epidemiologic research of depressive symptomatology in the general population. It was designed as a screening instrument to elicit symptoms associated with depression. It is intended to document the presence and severity of depressive symptoms but is not intended to make clinical diagnosis. It assesses the current state of the subject by focusing on symptomatology in the past week.
The scale is given at each exam. The scale is not given if the patient is: sedated, aphasic, non-English speaking, comatose, or uncooperative.
- PROCEDURE
- Each question is read to the subject who responds with one of four answers.
- Response alternatives should be printed on paper or cards which is/are placed in front of the patient for reference.
- Each category of response should be explained to the patient prior to the administering of the scale.
- If the patient is unable to read the response cards, the interviewer should read each response as well as the question referring to their feelings in the past week.
- Be sure that the patient understands that the questions refer to their feelings in the past week.
- CES-D SCORING
Patient responses are circled on the form; the score is the sum of 20 weighted responses and the final score is calculated by the computer. Score ranges from 0 to 60 by totaling all responses. Code “9 - refused or do not know” is not included in the score. Values for each question range from 0 to 3.
- METHODS
The CES-D Questionnaire consists of twenty questions. Since it is a scale for depression, it must be completed using responses by the participant, not a proxy.
- SCRIPT: The next few questions are about your feelings during the past week. For each of the following statements, please tell me if you felt that way much of the time during the past week.
- Hand card to participant and explain the categories to him/her.
The following definitions should be given.
Rarely or none of the time - Less than one full day
Some or a little of the time - One to two days in the past week
Occasionally or moderate amount of time - Three to four days in the past week or about half the time
Most or all of the time - Five to seven days in the past week
- Read each item as it is written on the form, continuing with the response
categories. For example:
- SCRIPT: During the past week I was bothered by things that usually don’t bother me. Did you feel that way rarely or none of the time, some or a little of the time, occasionally or moderate amount of time, or most or all of the time.
- Discontinue reading the responses when the participant provides a response before you are finished. On the next item, however, again begin to read the entire set of responses.
- When a participant asks for an interpretation of a particular response, reread the definitions to him/her.
- Code “9 - Refused or Do Not Know” is used when:
- The question was asked, but the participant chooses not to answer. For example, response was: “I would rather not say,” or “Go on to the next question”
- The question was asked, but the participant does not know, does not remember, or does not understand the form.
- Check the response on the form.
- When the participant refuses to respond to the statement, check “9 - refused or do not know”
- When the participant asks about the meaning of any item or tries to
qualify a statement, simply repeat the statement; for example:
PARTICIPANT: What do you mean by bothered?
INTERVIEWER: I was bothered by things that usually don’t bother me. Did you feel that way rarely or none of the time, some or a little of the time, occasionally or moderate amount of time, or most or all of the time during the past week.
- When the participant still asks about the meaning or says s/he does not understand, check “9 refused or do not know. Do not try to interpret the statement for the participant.
25. STUDY OF CORTISOL AND PULMONARY FUNCTION
Please refer to the PFT data set for most current data.
PROTOCOL FOR SUBJECT RECRUITMENT AND DISTRIBUTION OF QUESTIONNAIRES AND URINE COLLECTION MATERIALS
1. SUBJECT IDENTIFICATION
All subjects in the Offspring Cohort returning for their regularly scheduled visits to FHS, who live within the “Framingham Taxi Area” (consisting of Framingham and towns contiguous to Framingham as outlined in the map found in the clinic), or who work in Framingham, are eligible to participate in this study.
Eligible subjects will be identified prior to their clinic visit by reviewing the roster. These people will be recruited at the beginning of their visit, and if they agree to participate, their name tag will be marked with yellow highlighter.
2. SUBJECT RECRUITMENT
Eligible subjects (as identified by their place of residence as described above) will be recruited by a member of the clinic staff at the beginning of their visit. The study will be described and the urine collection procedure will be explained to the subject. If (s)he agrees to participate, the urine collection materials will be given to her(him) at this time and her(his) name tag will be marked with yellow highlighter to alert the phlebotomist to draw the two extra tubes of blood.
A log will be kept, recording each participant’s name, ID number, date of clinic visit, and if refused to participate, the reason for the refusal.
3. URINE COLLECTION KIT
A urine collection kit will be given to each subject who agrees to participate in this study. Subjects will be given a brief explanation of how to collect the urine. The kit consists of:
- a 3.5-liter specimen bottle with cap, labelled with the subject’s name and ID #, with summary instructions taped to the bottle
- an 8-ounce specimen cup
- a form with “Instructions for 24-hour Urine Collection” on one side, and “24-hour Urine Sample Collection Form” on the reverse side, with the subject’s name, ID#, and date of clinic visit
4. NOTIFICATION OF THE LABORATORY
If any subjects who previously agreed to participate (and therefore had blood drawn) are unable to complete the Pulmonary Function Test or change their mind about the urine collection, the laboratory will be notified so that they do not send the blood out for analysis.
5. RESPIRATORY QUESTIONNAIRE (RQ)
A copy of the RQ will be given to each member of the Offspring Cohort to complete at the time of his/her regular clinic visit. All subjects will complete the RQ, regardless of their participation in the Cortisol Study. The subject’s name and ID# will be entered on the top of the RQ.
6. DELIVERY OF URINE SAMPLES AND QUESTIONNAIRES
The participants will drop off the urine collection and the urine sample collection form in the designated container at the FHS. The urine sample will be taken to the lab for processing by the laboratory personnel.
7. ASSESSING PARTICIPATION
Subjects who fail to deliver a specimen within 2–3 weeks will be contacted by telephone and encouraged to complete the urine collection.
8. REVIEWING THE RESPIRATORY QUESTIONNAIRE
Questionnaires will be reviewed for completeness. Subjects who have left questions unanswered will be contacted by telephone, and answers to incomplete items solicited by directly questioning the subject; if the subject is uncertain of the answer, choose ’NO’.
Offspring 5 Clinic Phlebotomy Protocol
- Venipuncture to be performed on 5–7 fasting subjects between 8:15 am and 9:30 am five days a week.
- Total of 10–13 tubes of blood are collected, the number depending upon whether or not the patient is a participant in special cortisol or cholesterol studies.
- Phlebotomist should wear a clean lab coat and disposable protective gloves when collecting specimens.
- Blood drawing takes place in an isolated room where the patient’s name and ID number are checked before applying labels to the tubes.
- The participants are informed that blood is to be drawn and they are asked to lie down (the latter to standardize methodology and because platelet aggregation studies are done).
- With sleeves rolled up to expose the antecubital fossa, a tourniquet is applied 3–4 inches above the venipuncture site.
- After a suitable vein is found, the area is cleansed with a sterile alcohol prep and allowed to dry. A 21 guage needle, applied to a vacutainer holder, is used for venipuncture.
- The tourniquet is released after the last tube is drawn. The needle is removed and a fresh gauze is placed of the venipuncture site. Pressure is applied to stop bleeding, and a bandaid is applied.
- After the initial phlebotomy, persons without a history of diabetes mellitus, not taking insulin or oral hypoglycemic agents, and those without any other contraindications, are asked to consume a drink containing 75 gm glucose as part of a 2 hour glucose tolerance test.
- A follow-up phlebotomy specimen (for glucose and insulin levels) is drawn (subject may be in sitting position) two hours after the last of the 75 gm oral glucose load was consumed.


